Create a distance surveillance system
Make a simple distance surveillance system by building a periscope, mounting a toy camera or smartphone stand, and practicing remote observation safely.


Step-by-step guide to make a simple distance surveillance system
How to Set Up an IP Security Camera System from Scratch
Step 1
Gather all the materials on a clear table so everything is easy to reach.
Step 2
Ask an adult to help and to supervise while you cut and attach parts.
Step 3
Cut a rectangular viewing window at each end of the tube on opposite sides so light can enter and exit.
Step 4
Use a protractor or fold a piece of paper to find 45 degrees and mark where each mirror will sit inside each opening.
Step 5
Hold the top mirror inside the top opening at a 45 degree angle with the reflective side facing down and tape it securely.
Step 6
Hold the bottom mirror inside the bottom opening at a 45 degree angle with the reflective side facing up and tape it securely.
Step 7
Peek through the periscope and gently adjust each mirror until you can clearly see out the far opening.
Step 8
Decorate the outside of your periscope with markers or stickers to make it look like your spy gadget.
Step 9
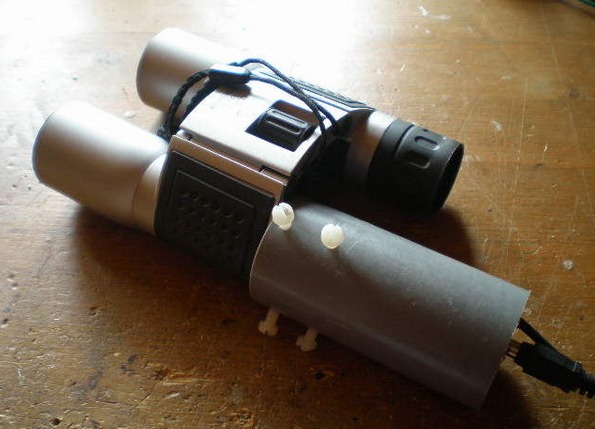
Tape the small toy camera stand to the top of the periscope so the stand faces into the top opening.
Step 10
Place a toy camera or smartphone on the stand and position it so the camera lens looks straight into the periscope opening.
Step 11
Ask a helper to place toys or walk at a distance while you watch the camera feed and practice safe remote observation from a window or door.
Step 12
Share your finished distance surveillance periscope on DIY.org
Help!?
What can we use instead of craft mirrors, a cardboard tube, or a toy camera stand if we can't find them?
If you don't have flat craft mirrors or a mailing tube, use smooth aluminum foil glued to stiff cardboard as mirrors, a cereal box or paper towel tube for the periscope body, and secure a smartphone or small toy camera with a rubber band on a folded-cardboard stand in place of the toy camera stand.
Why can't I see clearly when I peek through the periscope and how do I fix it?
If the view is blurry or dark when you peek through the periscope, double-check that each mirror's reflective side faces the correct way, re-position them exactly at 45° using your folded paper or protractor, make sure the rectangular openings are cut cleanly so light can enter and exit, and tape around the mirrors to seal gaps that let light leak.
How can I adapt this periscope activity for different age groups?
For preschoolers, have an adult pre-cut the rectangular viewing windows and place the mirrors so the child can focus on taping and decorating and watching a helper move toys, while older kids can measure 45° with a protractor, build an adjustable mirror hinge, and mount a smartphone on the stand to practice remote observation from farther away.
How can we make the periscope better or more fun after finishing the basic build?
To enhance your distance surveillance periscope, line the inside with black paper to reduce glare, add a small LED flashlight near the top opening for low-light viewing, create adjustable mirror hinges with tape and paper strips for fine tuning, and personalize the outside with stickers or a spy-name label before sharing on DIY.org.
Watch videos on how to make a simple distance surveillance system
How to Install Night Owl Wireless Security System | Easy DIY Surveillance Setup
4 Videos
How to Install Night Owl Wireless Security System | Easy DIY Surveillance Setup
Beginner's Guide to IP Cameras Step-by-Step Wired and Wi-Fi Setups
Beginners Guide On Things to Know BEFORE Buying A Security Camera
SimpliSafe Home Security Setup & Installation - Incredible Security System
Facts about optics and remote observation for kids
🪞 A periscope uses two mirrors (or prisms) set at 45° to bounce light so you can see over or around obstacles.
📱 You can turn a smartphone into a tiny surveillance camera by mounting it steady and using a recording or livestreaming app.
🕵️♀️ Periscopes were widely used in submarines and on battlefields so people could observe without being seen.
🔧 You can build a working cardboard periscope in about 20–30 minutes with simple supplies like mirrors, tape, and scissors.
🐾 Scientists use remote cameras and camera traps to watch wildlife safely without disturbing animals.
How do I make a simple distance surveillance system at home with a periscope and toy camera?
What materials do I need to build a kid-friendly periscope and mount a toy camera or smartphone?
What ages is this distance surveillance periscope activity suitable for?
What safety and privacy rules should parents follow when kids use a periscope-based surveillance system?
