Create a 3D Gear Using Tinkercad
Design and build a simple 3D gear in Tinkercad, learn about teeth spacing and gear ratios, then export for 3D printing.


Step-by-step guide to create a 3D gear using Tinkercad
Step 1
Open the Tinkercad website in your web browser.
Step 2
Sign into your Tinkercad account.
Step 3
Click "Create New Design" to start a fresh workplane.
Step 4
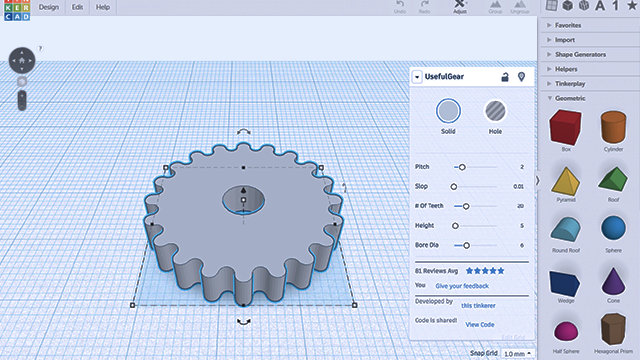
Drag a cylinder shape onto the workplane to be the base of your gear.
Step 5
Resize the cylinder to a diameter of 40 mm and a thickness of 3 mm using the shape handles.
Step 6
Choose how many teeth you want and write that number down (pick a number between 8 and 24).
Step 7
Drag a box shape onto the workplane and resize it to 4 mm wide by 3 mm tall by 6 mm deep to make one tooth.
Step 8
Move the tooth so it sits on the edge of the cylinder and touches the rim.
Step 9
Calculate the rotation angle by dividing 360 by your number of teeth (angle = 360 ÷ number of teeth).
Step 10
Duplicate the tooth and rotate the copy by the angle you calculated and keep duplicating and rotating until your gear is filled with evenly spaced teeth.
Step 11
Select the cylinder and all the teeth and group them into one solid gear.
Step 12
Drag a smaller cylinder onto the center of the gear, set it as a hole with a 3 mm diameter and the same thickness as the gear, then align it in the middle to make an axle hole.
Step 13
Use Tinkercad’s ruler tool to check that tooth thickness and walls are at least 2 mm and adjust if needed for printing.
Step 14
Click Export and choose the .STL file format to save your gear for 3D printing.
Step 15
Share a photo and description of your finished 3D gear on DIY.org.
Final steps
You're almost there! Complete all the steps, bring your creation to life, post it, and conquer the challenge!

Help!?
What can we use if we can't access or sign into Tinkercad?
Use another CAD tool like FreeCAD or Onshape and replicate the same steps by creating a 40 mm diameter × 3 mm thick cylinder base, a 4×3×6 mm box tooth, duplicating/rotating teeth by 360 ÷ number of teeth, grouping, adding a 3 mm hole, and exporting as .STL.
My teeth aren't spacing evenly when I duplicate and rotate—what should I check?
Check your calculated rotation angle (angle = 360 ÷ number of teeth), enter that exact rotation value for each duplicated 4×3×6 mm tooth in the inspector, and use Tinkercad's snap grid and align tools so each tooth sits flush on the cylinder rim before grouping.
How can I adapt this activity for younger or older kids?
For younger kids, simplify by choosing fewer teeth (like 8) and pre-placing the 40 mm×3 mm cylinder and one 4×3×6 mm tooth for them to duplicate, while older kids can vary tooth counts, adjust tooth thickness with the ruler tool, add spokes, or design meshing gears to explore gear ratios.
What are easy ways to enhance or personalize the gear after making it?
Personalize the 40 mm gear by engraving a name or adding spokes, ensure tooth walls stay at least 2 mm using the ruler tool for printing, create a matching gear with a 3 mm axle hole to test meshing, export as .STL, and share a photo on DIY.org.
Watch videos on how to create a 3D gear using Tinkercad
TinkerCAD - Tutorial for Beginners in 10 MINS! [ FULL GUIDE 2024 ]
4 Videos
![TinkerCAD - Tutorial for Beginners in 10 MINS! [ FULL GUIDE 2024 ]](https://img.youtube.com/vi/QIn9c5TjrKk/mqdefault.jpg)
TinkerCAD - Tutorial for Beginners in 10 MINS! [ FULL GUIDE 2024 ]
Design custom 3D printed parts - Learn Tinkercad in under 20 minutes
How to make 3d printed Gears in Tinkercad /Cura with 1:2 transmission for Arduino project
How to Use Tinkercad for 3D Printing (Step-by-Step Beginner's Guide)
Facts about 3D design and printing for kids
⚙️ Gear ratio = number of teeth on the driven gear ÷ number of teeth on the driving gear — it determines speed vs. torque.
🖨️ Many hobby 3D printers can produce working gears, but very fine teeth (under ~1 mm) often need higher-resolution or resin printing.
🧩 Spur gears have straight teeth and are the simplest gear type, making them ideal for kid-friendly projects and lessons.
🛠️ Tinkercad is a free, browser-based 3D design app from Autodesk that's perfect for beginners to design simple parts like gears.
🔁 When two gears mesh they rotate in opposite directions — adding an idler gear can make the output rotate the same way as the input.
How do I design and build a simple 3D gear in Tinkercad for 3D printing?
What materials and tools do I need to create a 3D gear in Tinkercad and print it?
What ages is creating a 3D gear in Tinkercad suitable for?
What variations can we try after making a basic 3D gear?


One subscription, many ways to play and learn.
Only $6.99 after trial. No credit card required