Clamp a wood project
Learn how to use clamps to hold wood pieces together while glue dries, making a small glued wooden plaque with adult supervision.

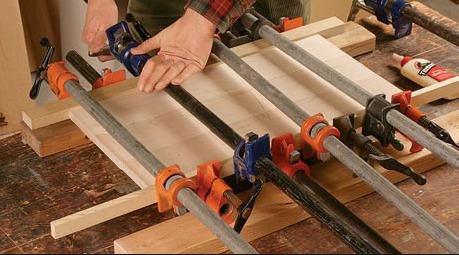

Step-by-step guide to clamp a small wooden plaque
Routing Tiny Pieces? Here's How to Clamp Safely! #Woodworking #Shorts
Step 1
Gather all the materials and bring them to a clean flat workspace.
Step 2
Lightly sand the edges of each wood piece where they will meet until the surfaces feel smooth.
Step 3
Place the two wood pieces together in the shape you want for your plaque without using glue.
Step 4
Make small pencil alignment marks so you know exactly how the pieces should line up.
Step 5
Squeeze a thin even line of wood glue along the joining edge of one wood piece.
Step 6
Press the glued edge to the other piece so the pencil marks line up and hold them together briefly.
Step 7
Wipe any glue that squeezes out with a damp cloth right away.
Step 8
Put scrap wood pads or cardboard on the clamp jaws to protect the wood surfaces.
Step 9
Position the clamp so the pads touch the wood and the clamp sits over the glued joint.
Step 10
With adult help tighten the clamp slowly until the pieces are snug but do not over-tighten.
Step 11
Leave the clamp in place for the drying time shown on the glue label so the joint cures fully.
Step 12
Remove the clamp and sand any dried glue or rough edges to finish the plaque surface.
Step 13
Take a photo of your finished plaque and share your creation on DIY.org
Help!?
What can we use if we don't have a clamp?
If you don't have a clamp, stack heavy books or use a ratchet strap or elastic bands over the glued joint with scrap wood pads or cardboard protecting the surfaces to apply even pressure while the glue dries.
My pieces shifted when I tightened the clamp — how can I fix alignment?
Use the pencil alignment marks made when you placed the two wood pieces together, press the glued edge back to match those marks, hold briefly, then tighten the clamp slowly and evenly so the marks stay lined up and the joint doesn't move.
How can we adapt this activity for younger or older kids?
For younger children, have an adult pre-sand the edges, squeeze the thin even line of wood glue, and tighten the clamp while the child lines up the pencil marks and wipes excess glue, whereas older kids can do the sanding, precise gluing, clamp adjustment, and final sanding themselves for more practice.
How can we personalize or enhance the finished plaque?
After you remove the clamp and sand any dried glue, personalize the plaque by staining or painting it, wood-burning a name or design, or attaching a sawtooth hanger or small hooks before taking a photo to share on DIY.org.
Watch videos on how to clamp a small wooden plaque
Clamping 101 -- Getting a Good Mix
4 Videos

Clamping 101 -- Getting a Good Mix
The Work Around: How to Use Clamps for Woodworking | HGTV
An Angle Cut Clamping Hack! Learn a Great Little Trick For Woodworking
How to Use Hand Screw Clamps — Tips, Tricks, and Woodshop Hacks
Facts about woodworking for kids
🪚 Clamps come in many types — bar, C-clamp, spring, pipe and more — and each type is best for different gluing jobs.
🧰 A tiny bead of glue squeeze-out along a joint usually means you used the right amount of glue and enough clamping pressure.
🕒 Most PVA wood glues reach useful strength in 30 minutes to an hour but take about 24 hours to reach full strength.
🛡️ Put scrap wood or protective pads between clamp jaws to avoid leaving dents or marks on your project.
🪵 Many clamps can exert over 100 pounds of pressure — it’s clamp technique, not brute force, that makes a strong joint.
How do you clamp a small glued wooden plaque with a child?
What materials do I need to clamp a wood plaque project?
What ages is this clamping and gluing activity suitable for?
What safety tips should we follow when clamping wood with children?
