Build a Lemon Battery
Build a lemon battery using lemons, copper and zinc electrodes, and wires to power a small LED or measure voltage, exploring basic electricity.


Step-by-step guide to build a lemon battery
Step 1
Gather all your materials on a clean table so everything is ready to use.
Step 2
Press and roll Lemon 1 on the table with your palm to make it juicier.
Step 3
Push a copper coin or strip partway into Lemon 1 near one side.
Step 4
Push a galvanized nail partway into Lemon 1 about two centimeters away from the copper.
Step 5
Roll Lemon 2 on the table with your palm to make it juicier.
Step 6
Push a copper coin or strip partway into Lemon 2 near one side.
Step 7
Push a galvanized nail partway into Lemon 2 about two centimeters away from the copper.
Step 8
Roll Lemon 3 on the table with your palm to make it juicier.
Step 9
Push a copper coin or strip partway into Lemon 3 near one side.
Step 10
Push a galvanized nail partway into Lemon 3 about two centimeters away from the copper.
Step 11
Clip one alligator wire between the nail of Lemon 1 and the copper of Lemon 2 to join those two cells.
Step 12
Clip a second alligator wire between the nail of Lemon 2 and the copper of Lemon 3 to continue the series.
Step 13
Clip an alligator wire from the copper of Lemon 1 to the long leg of the LED (positive) and secure with tape if needed.
Step 14
Clip an alligator wire from the nail of Lemon 3 to the short leg of the LED (negative) and secure with tape if needed.
Step 15
Take a picture or write about your glowing lemon battery and share your finished creation on DIY.org
Help!?
What can I use instead of copper coins, galvanized nails, or alligator wires if I can't find them?
If you don't have copper coins, push a short strip of clean copper wire or a penny into each lemon in place of the copper, use a zinc-coated screw or galvanized bolt instead of the galvanized nail, and substitute straightened paper clips taped to the metals for alligator wires.
My LED doesn't light — which steps and connections should I check first?
Make sure each coin and nail is pushed into its lemon about two centimeters apart, the nail of Lemon 1 is clipped to the copper of Lemon 2 and the nail of Lemon 2 to the copper of Lemon 3, and that the LED's long leg is connected to copper of Lemon 1 while the short leg goes to the nail of Lemon 3 with tight clips or tape to ensure good contact and correct polarity.
How can I adapt this lemon battery activity for younger children or for older kids who want more challenge?
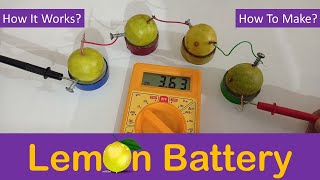
For younger kids have an adult pre-poke holes and set up the rolled lemons and clipped wires while older kids can add a multimeter across the copper of Lemon 1 and the nail of Lemon 3 and vary the number of lemons to study how series connections affect LED brightness.
How can we extend or personalize the lemon battery once the LED lights up?
Extend the project by adding more lemons in series to power extra LEDs, swapping in limes or potatoes to compare which fruits produce a brighter glow, and personalize by labeling or decorating each lemon and photographing the final setup for sharing.
Watch videos on how to build a lemon battery
How To Make A Lemon Battery | Johns Hopkins Center for Talented Youth
4 Videos

How To Make A Lemon Battery | Johns Hopkins Center for Talented Youth

How to Make a Lemon Battery (Chemistry)

How a Lemon Battery Generates Electricity - Simple Science Experiment
How To Make Lemon Battery At Home - Lemon Battery Science Experiment - Lemon Battery Science Project
Facts about electricity and electrochemistry
🍋 A single lemon with copper and zinc can produce about 0.7–1.0 volts — enough to light a tiny LED with enough cells!
🔗 Put lemons in series to add voltage (like stacking batteries) or in parallel to increase current for longer runs.
🧪 The citric acid in lemon juice is the electrolyte that helps ions move between the two metal electrodes.
⚡ Alessandro Volta built the first true battery, the voltaic pile, in 1800 after experiments with 'animal electricity.'
🛠️ The zinc electrode slowly corrodes (oxidizes) during the reaction — that's the chemical process that makes the electric current.
How do I build a lemon battery with my child to power an LED or measure voltage?
What materials do I need to build a lemon battery?
What ages is a lemon battery activity suitable for?
Is it safe to build a lemon battery, and what safety tips should parents follow?
