Build a Constraint Bridge in Your Obby Game
Design and build a constraint-based bridge for your obby game using simple parts and joints, then test player crossings and adjust for stability.

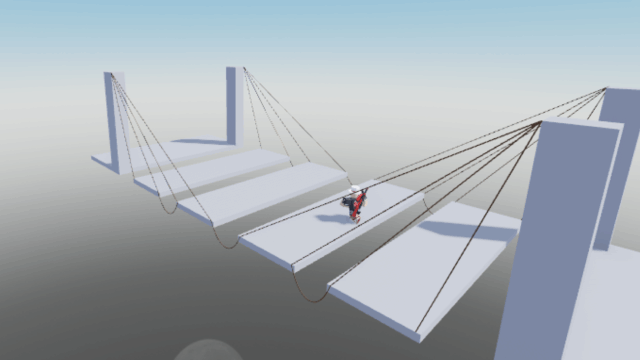

Step-by-step guide to build a constraint bridge in your obby game
Step 1
Open your obby game's editor and load the level where you want to build the bridge.
Step 2
Place two anchor platforms on opposite sides of the gap using the part tool.
Step 3
Use the grid or ruler tool to measure how wide the gap is.
Step 4
Select a plank part to use for the bridge deck.
Step 5
Place the first plank so one edge touches an anchor and it points across the gap.
Step 6
Duplicate that plank across the gap until the deck reaches the other anchor.
Step 7
Attach constraints between each pair of adjacent planks along the deck at regular intervals.
Step 8
Place two support beams or cables under or beside the deck near the middle.
Step 9
Attach constraints from each support to the deck and to the anchors for extra strength.
Step 10
Switch into Play/Test mode so you can try crossing the bridge.
Step 11
Walk your avatar across the bridge to test how it behaves under weight.
Step 12
Watch for wobble or any parts that move or break and remember where they are.
Step 13
Go back to the editor and add extra constraints or supports at the weak spots you saw.
Step 14
Re-test the bridge in Play/Test mode and repeat strengthening until the crossing is steady.
Step 15
Share your finished constraint bridge on DIY.org.
Help!?
What can we use if the 'plank part' or 'support beams' are missing in the editor?
Use flat panel parts or long thin blocks welded together as the deck and substitute missing support beams or cables with thin rod parts or rope constraints attached to the anchors.
My bridge wobbles or parts break when I test it — what should I fix first?
If you see wobble or broken parts in Play/Test mode, go back to the editor and add extra constraints between the wobbling plank pairs, place support beams or cables near the weak spot, and ensure each plank edge is properly attached to an anchor.
How can I adapt the bridge-building steps for younger or older kids?
For younger kids make the gap smaller, use fewer duplicated planks and simple weld constraints for a rigid deck, while older kids can measure a wider gap with the grid tool, space planks precisely, and experiment with multiple support cables and tension settings.
How can we enhance or personalize the finished constraint bridge before sharing it?
After re-testing and strengthening weak spots, personalize the bridge by adding textures or lights, attach decorative cables to the anchors, add moving obstacles or a timed crossing challenge, and then share the level on DIY.org.
Watch videos on how to build a constraint bridge in your obby game
10 FREE backyard obstacle course ideas to UP YOUR DAD GAME
4 Videos

10 FREE backyard obstacle course ideas to UP YOUR DAD GAME
PLAY IDEAS | How to make an indoor obstacle course for kids
Kids Woven Rope Suspension Bridge for Active Play and Adventures
PLAY INSPIRATION | 20 Plus Easy DIY Indoor Obstacle Course Ideas
Facts about game physics and structural design
🌉 The Danyang–Kunshan Grand Bridge in China is the longest bridge in the world at about 164.8 km — wow, that's a massive span to imagine in your obby!
🔺 Engineers use triangles (trusses) because a triangle can't change shape without stretching a side — that makes it super stable for bridges.
⚙️ Game physics engines simulate gravity, forces, and constraints so in-game bridges can wobble or collapse much like real ones when overloaded.
🧩 Common joint types you’ll use in builds and games include hinge, ball-and-socket, and fixed joints — each lets parts move in different ways.
🎮 “Obby” is gamer slang for “obstacle course,” especially popular on Roblox where players design platforming challenges and creative bridges.
How do I design and build a constraint-based bridge in my obby game?
What materials and tools do I need to build a constraint bridge in an obby?
What ages or skill levels is building a constraint bridge in an obby suitable for?
What are the benefits of building constraint bridges in an obby and how can I vary the challenge?
