Assemble a botany kit
Assemble your own botany kit with a magnifying glass, plant press, seed packets, field notebook, and labels to observe, record, and learn about plants.


Step-by-step guide to assemble a botany kit
Parts of Plants for Kids | Learn all about plant parts and their functions
Step 1
Gather all the Materials Needed and bring them to your workspace.
Step 2
Choose a sturdy box or container to be your botany kit and set it on a flat surface.
Step 3
Cut the two pieces of cardboard so they fit inside the container.
Step 4
Cut the absorbent paper or coffee filters so they match the cardboard size.
Step 5
Make the plant press by stacking one cardboard then absorbent paper then the other cardboard and secure the stack with rubber bands or string.
Step 6
Write a label for each seed envelope using the labels or sticky labels.
Step 7
Place seeds into the matching labeled envelopes and fold or seal them.
Step 8
Write your name on the cover of the small notebook to make it your field notebook.
Step 9
On the first page of the notebook write the headings: Date Location Plant Notes.
Step 10
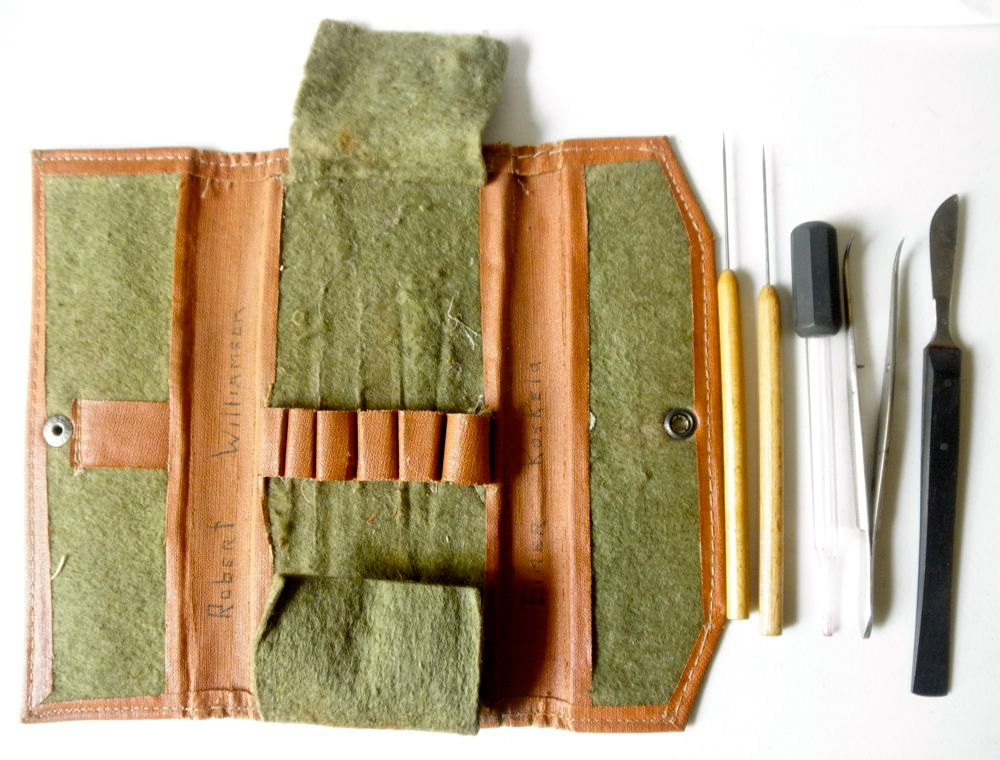
Place the magnifying glass pencil extra labels and a few empty envelopes into the container.
Step 11
Go outside and carefully collect one small leaf or flat flower to press.
Step 12
Put the specimen between absorbent paper inside your plant press and tighten the rubber bands so it will dry flat.
Step 13
Write the specimen’s first entry in your field notebook recording the date the location the plant name and one short observation.
Step 14
Put the plant press back into your kit and close the container.
Step 15
Share your finished botany kit and your first pressed specimen on DIY.org.
Help!?
What can we use instead of absorbent paper, coffee filters, or a magnifying glass if we can't find them?
If you don't have absorbent paper or coffee filters for Step 4, cut plain white paper towels or blotting paper to the cardboard size and use a smartphone camera with zoom or a hand-lens app in place of the magnifying glass.
My leaf came out wrinkled or slightly moldy after pressing—what should I do?
If a specimen is wrinkled or moldy after Step 13, replace the damp absorbent paper with fresh dry sheets cut to the cardboard size, retighten the rubber bands or string around the cardboard stack, and leave the closed container in a warm, dry spot to finish drying.
How can I adapt this botany kit activity for different ages?
For younger children, pre-cut the cardboard and absorbent paper and have them place one leaf and draw in the field notebook, while older kids can label envelopes with scientific names, add GPS coordinates under 'Location', and press multiple specimens for comparison.
What are simple ways to extend or personalize the botany kit after finishing the basic steps?
Decorate the container cover, add silica gel packets or extra absorbent paper for better drying, mount pressed specimens in the notebook with archival tape and photos, and create a digital album to share your finished kit and pressed specimen on DIY.org.
Watch videos on how to assemble a botany kit
Life Cycle of a Plant for Kids! | Learn Parts of a Plant 🌱 | Twinkl USA
4 Videos

Life Cycle of a Plant for Kids! | Learn Parts of a Plant 🌱 | Twinkl USA
Life Cycle of Plants | Science for Kids
Facts about PLANTS For Kids | Learn all About Botany, Houseplants, Flowers and Trees
Plants for Kids 🌱 Learn Plant Names, Parts & How They Grow!
Facts about botany and plant observation
🌱 There are over 390,000 known plant species in the world — that's a giant green library to explore!
🏛️ Some herbaria hold millions of dried plant specimens; the Royal Botanic Gardens, Kew has a collection of over 7 million.
🔎 A 10× magnifying glass can make tiny leaf hairs, pollen grains, and insect visitors much easier to see.
🌰 Seeds can remain viable for decades — some seeds stored in seed banks have germinated after 100+ years.
✍️ Field notebooks and pressed specimens are often how scientists first document and describe new plant species.
How do I assemble and use a kid-friendly botany kit to observe and learn about plants?
What materials do I need to create a simple home botany kit?
What ages is a DIY botany kit suitable for?
What are the benefits of assembling and using a botany kit with my child?
