How to draw a spider - a free spider drawing guide
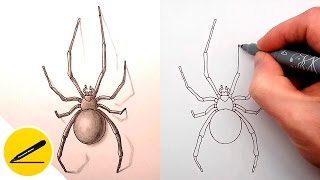
Draw a realistic spider using simple shapes, lines, and shading to show legs and body. Practice observation and fine motor skills.


Get inspired with these


Instructions
How to Draw a Spider - drawing tutorial for beginners or kids
Step 1
Gather your materials and pick a clear spider photo to look at closely.
Step 2
Lightly draw a small circle for the spider’s head near the top of your paper.
Step 3
Lightly draw a larger oval behind the head for the spider’s abdomen.
Step 4
Draw a faint centerline from head to abdomen to help keep both sides even.
Step 5
Put four small dots along each side of the centerline where the legs will attach.
Step 6
Draw the eight legs as curved segmented lines starting from the dots and try to match shapes on each side.
Step 7
Draw the spider’s eyes as small circles on the head using your photo to place them.
Step 8
Refine the body and leg shapes by smoothing lines and erasing extra guidelines.
Step 9
Add tiny short lines on the legs and body to show hairs and texture.
Step 10
Choose the direction of your light source by pointing with your pencil to one side of the spider.
Step 11
Shade the opposite side from the light with gentle strokes and blend with a tissue or stump for softness.
Step 12
Darken the final outlines with a fine-tip pen or a darker pencil and add small details like fangs or patterning.
Step 13
Take a photo of your finished realistic spider drawing and share it on DIY.org.
Final steps
You're almost there! Complete all the steps, bring your creation to life, post it, and conquer the challenge!


Help!?
I don’t have a blending stump or fine-tip pen—what can I substitute?
If you don't have a blending stump use a folded tissue, cotton swab, or your fingertip to blend the shading, and swap a fine-tip pen for a sharpened darker pencil to darken the final outlines.
My spider’s legs look uneven or crooked—what step can fix that?
If the legs look uneven, keep the faint centerline visible while adjusting the four small dots on each side as leg-attachment guides and redraw the segmented curved lines before erasing guidelines.
How can I adapt this drawing for different ages or skill levels?
For younger kids simplify by drawing a bigger circle and oval and fewer, single-segment legs with a marker, while older kids can add the tiny hairs, blended shading with a tissue or stump, and darken details with a fine-tip pen for realism.
How can we make the spider drawing more interesting or personal?
To enhance the drawing choose a dramatic light direction in the light-source step, add unique patterning, fangs, or colored-pencil highlights during the final-detail step, and then photograph the finished realistic spider to share on DIY.org.
Related videos
How to Draw a Spider Step by Step - Drawing Tutorial Video
3 Videos
How to Draw a Spider Step by Step - Drawing Tutorial Video
Learn to Draw a Spider STEP BY STEP!
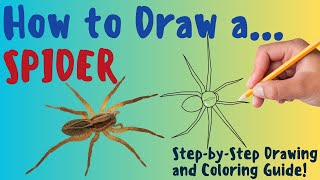
How To Draw A Spider - Fun & Easy Step-by-Step Drawing and Coloring Guide
Fun Facts
🕷️ Most spiders have eight legs — counting them helps you place them evenly and symmetrically when you draw!
🎨 Simple shading (light and dark areas) can make a spider's round abdomen and jointed legs look convincingly 3D.
🧵 Spider silk is incredibly strong for its weight — some kinds are comparable to steel in tensile strength!
👀 Spiders can have from 2 to 8 eyes depending on the species, so their eye patterns are fun details to observe in photos.
📐 Spiders show bilateral symmetry, so drawing one side then mirroring it helps keep proportions balanced.
How do I draw a realistic spider using simple shapes?
What materials do I need to draw a realistic spider?
What ages is drawing a realistic spider suitable for?
What are safety tips and creative variations for drawing spiders?


One subscription, many ways to play and learn.
Only $6.99 after trial. No credit card required