Trace your palm on Procreate!
Open Procreate to trace your palm, then decorate the digital palmprint with colors, textures, and layers to learn drawing and editing tools.


Step-by-step guide to trace your palm on Procreate
Step 1
Open the Procreate app on your iPad.
Step 2
Create a new canvas using the + button and pick a size that fits your hand.
Step 3
Take a clear photo of your open palm with the iPad camera.
Step 4
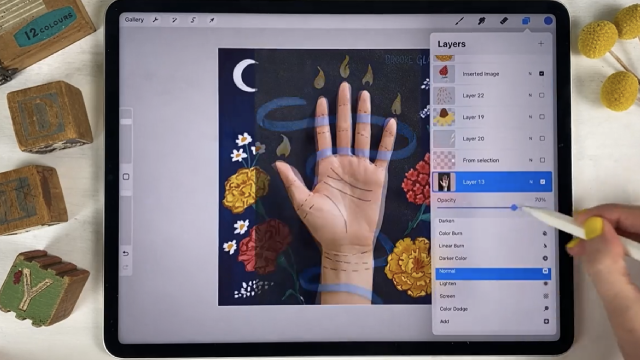
Insert the palm photo into your canvas using Actions > Add > Insert a photo.
Step 5
Lower the photo layer opacity so the photo looks faint and easy to trace.
Step 6
Add a new layer above the photo layer for tracing.
Step 7
Choose a brush and a color you like for the outline.
Step 8
Trace the outer shape of your palm on the new layer by following the faint photo.
Step 9
Create another new layer beneath the outline layer for colors.
Step 10
Fill the inside of your palm with base colors using a brush or the color-drop tool.
Step 11
Add fingerprints lines textures or fun patterns on new layers using different brushes.
Step 12
Try changing a layer’s blending mode or opacity to make cool effects.
Step 13
Export your finished palmprint as an image to your Photos using Share > Export.
Step 14
Share your finished palmprint on DIY.org.
Help!?
What can we use if we don't have an iPad or Procreate?
If you don't have Procreate or an iPad, use a similar app with layers like Autodesk SketchBook or Adobe Fresco on a tablet/phone or simply take the palm photo, print it, and trace it on paper following the same 'insert a photo' and tracing steps.
My photo is too dark or I can't see it well enough to trace—what should I do?
Select the photo layer in the Layers panel and lower its opacity slider to make it faint, and if the photo is the wrong size use Transform > Uniform to resize it and be sure you added a new layer above the photo for tracing before you draw.
How can I adapt this activity for different ages?
For younger children use a large canvas and a thick brush on the tracing layer with simple color fills on the color layer (and adult help taking the photo), while older kids can add fingerprint textures on separate layers, experiment with blending modes and opacity, and use finer brushes for detail.
How can we enhance or personalize the finished palmprint?
Add extra layers for background patterns, names or stickers, try different brushes for fingerprint textures and layer blending modes for glow or shadow effects, then export via Share > Export to save and share on DIY.org.
Watch videos on how to trace your palm on Procreate
Procreate Beginners Series: Part One | The Fundamentals
4 Videos

Procreate Beginners Series: Part One | The Fundamentals
10 things you NEED to know in PROCREATE

Tracing a photo in Procreate (how To step by step Tutorial)

How to trace an image in PROCREATE // things to know!
Facts about digital drawing and editing for kids
🖌️ Procreate is a popular iPad drawing app used by both hobbyists and professional artists around the world.
✍️ Tracing is a fun way to learn shapes and improve hand-eye coordination—it’s a great beginner tool!
📱 Apple Pencil senses pressure and tilt so your strokes can look thin, thick, or shaded like real tools.
🖼️ Layers let you experiment freely—add color, texture, or effects on new layers without changing your traced palm.
🖐️ Every palm has unique lines and patterns, so each decorated palmprint you make will be one-of-a-kind!
How do you trace your palm in Procreate?
What materials do I need to trace a palm in Procreate?
What ages is tracing your palm in Procreate suitable for?
What are the benefits, safety tips, and variations of tracing a palm in Procreate?
