The Lizard Pose Challenge
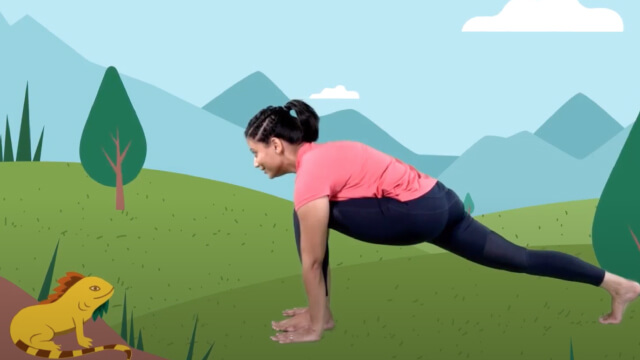
Practice the Lizard Pose to stretch hips and build balance: learn proper alignment, breathe deeply, hold for counts, and switch sides safely.
About this activity
Practice the Lizard Pose to stretch hips and build balance: learn proper alignment, breathe deeply, hold for counts, and switch sides safely.
What you need
Step by step
- 1
Step 1
Lay your mat or towel on the floor in a quiet space.
- 2
Step 2
Stand at the top of the mat with your feet hip-width apart.
- 3
Step 3
Take three slow deep breaths to help your body relax.
- 4
Step 4
Step your right foot forward into a lunge so your right knee sits over your right ankle.
- 5
Step 5
Place both hands on the floor inside your right foot.
- 6
Step 6
Lower your left knee down to the mat gently.
- 7
Step 7
Walk your right foot a little to the right to open your right hip.
- 8
Step 8
If it feels comfortable, lower your forearms to the mat to deepen the stretch.
- 9
Step 9
Square your hips so they face the front of the mat.
- 10
Step 10
Hold the pose and take five slow deep breaths, counting each inhale and exhale.
- 11
Step 11
Press your hands into the mat to lift your chest and prepare to come out.
- 12
Step 12
Carefully step your left foot forward to meet your right foot.
- 13
Step 13
Stand up tall and shake out your legs if they feel tight.
- 14
Step 14
Repeat Steps 4–13 on the other side to stretch both hips evenly.
- 15
Step 15
Share your finished Lizard Pose practice on DIY.org.
Fun facts
How do you do the Lizard Pose Challenge?
Start in a low lunge with your right foot forward and your left knee on the mat. Walk your right foot slightly to the outside of your right hand. Square your hips forward, lengthen your spine, and breathe deeply. Lower onto your forearms for a deeper hip stretch or keep your hands on the mat for more balance. Hold for 5–10 slow breaths, then return to a neutral position and repeat on the other side. Move slowly and keep shoulders relaxed.
What materials do I need for the Lizard Pose Challenge?
You only need a non‑slip yoga mat and comfortable clothing. Optional items that help kids: a yoga block or firm cushion to support the forearms, a folded towel for knee padding, and a timer to count breaths. Have water nearby and an adult to supervise younger children. No special equipment is required, but props make the pose safer and more accessible.
What ages is the Lizard Pose Challenge suitable for?
This activity suits most children aged about 5 and up with adult supervision. Younger kids can try a playful, gentler version with the back knee down and shorter holds. Older children and teens can use fuller versions and hold longer. Always adjust depth to the child’s flexibility and coordination and avoid forcing the pose. Check with a pediatrician if there are joint or spine concerns.
What are safety tips for the Lizard Pose Challenge?
Warm up hips and legs first with gentle movements. Keep the front knee over the ankle to protect joints and avoid twisting the knee inward. Use a block or rest on the hands if forearm lowers feel too intense. Stop if the child feels sharp pain; mild stretching discomfort is normal. Limit hold times for beginners, supervise closely, and consult a healthcare provider for existing hip, knee, or back injuries.
Watch & Learn
Need help?
What can I use instead of a yoga mat if I don't have one for the Lizard Pose?
If you don't have a yoga mat, use a folded towel or blanket under your mat area and put a sturdy book or small pillow under your hands when you place both hands on the floor inside your right foot (Steps 1 and 6) to protect your knees and wrists.
I'm having trouble lowering my forearms or my hip feels too tight—what should I do?
If you can't comfortably lower your forearms in Step 8, keep both hands on the floor inside your right foot (Step 6) or rest your forearms on blocks/books and walk your right foot a little further to the right (Step 7) while checking that your right knee stays over your ankle (Step 4).
How can I modify the pose for different ages or skill levels?
For younger children, keep the back knee down and hold for one or two breaths instead of five (Steps 6 and 9), while older or more advanced kids can hold for 5–10 breaths, lower forearms (Step 8), or add a gentle hip rock before switching sides (Step 13).
How can we make the Lizard Pose Challenge more fun or challenging to extend the activity?
To personalize and extend the challenge, decorate your mat, time each side and try adding one extra breath each session, or take a photo of your finished Lizard Pose and share it on DIY.org as suggested at the end of the instructions.