Sour Patch Paper Squishy with DIY Star RosieDonut14
Make a soft, squishy paper candy toy shaped like a star donut using tissue, tape, stuffing, and paint; decorate and practice safe crafting techniques.
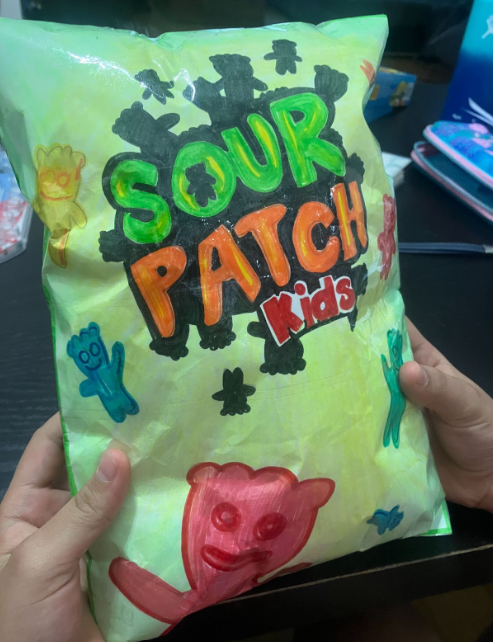
About this activity
Make a soft, squishy paper candy toy shaped like a star donut using tissue, tape, stuffing, and paint; decorate and practice safe crafting techniques.
What you need
Step by step
- 1
Step 1
Lay the scrap paper flat on your table to protect the surface.
- 2
Step 2
Put all the materials from the list on the covered workspace within easy reach.
- 3
Step 3
Stack three sheets of tissue paper neatly one on top of another.
- 4
Step 4
Use the marker to draw a star shape with a round hole in the middle on the top tissue layer about the size of your palm.
- 5
Step 5
Cut out the star donut shape through all three tissue layers with scissors.
- 6
Step 6
Wrap small pieces of clear tape around the outer edges of the stacked star layers leaving a two-inch gap open for stuffing.
- 7
Step 7
Gently push small bits of stuffing into the gap until the star donut feels soft and squishy in the points and center.
- 8
Step 8
Seal the gap tightly with more clear tape so the stuffing stays inside.
- 9
Step 9
Smooth and shape the stuffed star donut with your hands until it looks even and puffy.
- 10
Step 10
Dip the paintbrush lightly in watered-down paint and paint a thin base color over the paper squishy.
- 11
Step 11
Paint small colorful dots or stripes like candy sprinkles on top of the base color for decoration.
- 12
Step 12
Let your paper squishy dry completely on the scrap paper before handling again.
- 13
Step 13
Share your finished sour patch star donut squishy on DIY.org
Fun facts
How do I make a Sour Patch Paper Squishy star donut at home?
Make a template of a star-shaped donut on cardboard. Trace and cut two matching star-donut outlines from cardstock for stability. Lay several layers of tissue between them, leaving a small opening. Tape the edges with clear or masking tape, then carefully stuff with polyester filling or crumpled tissue to squishiness you like. Seal the opening with tape, smooth edges, and paint non-toxic acrylic or tempera. Let dry, then add details with markers. Adult help is recommended for cutting and paintin
What materials do I need for a Sour Patch Paper Squishy DIY?
You’ll need lightweight tissue paper, polyester stuffing or extra crumpled tissue, cardstock or thin cardboard for a template, scissors, clear or masking tape, non-toxic acrylic or tempera paint, a small paintbrush, and washable markers for details. Optional extras: glitter glue, stickers, or a kid-safe sealant. Always choose age-appropriate scissors and non-toxic supplies, and keep small items away from very young children.
What ages is this Sour Patch Paper Squishy activity suitable for?
This craft suits children about 5 years and up with adult supervision. Ages 5–7 can do tearing/taping and stuffing with help for cutting and painting. Kids 8+ can handle template cutting, painting, and decorating more independently. Not suitable for children under 3 due to small bits and tape. Adjust complexity—simpler stuffing for younger kids, more detailed painting for older children.
What safety tips and fun variations can I use for the paper squishy?
Safety first: use child-safe scissors, non-toxic paints, and avoid loose glitter for toddlers. Supervise cutting, taping, and stuffing; skip hot glue. For variations, try different shapes (hearts, animals), scented squishies by adding a drop of food-safe flavoring to stuffing, or layered colors for a tie-dye effect. Benefits include fine motor practice, creativity, and following steps. Always let paint fully dry before playing.
Watch & Learn
Need help?
What can I use instead of tissue paper, clear tape, or stuffing if I can't find them?
If you don't have tissue paper, substitute three stacked coffee filters or lightweight crepe paper for Step 3, and if stuffing or clear tape are missing, use small balled-up tissues or cotton balls for Step 6 and a glue stick or a few small staples around the edges in Steps 5 and 7 to seal.
The paper tears when I cut or stuffing keeps leaking out—what should I do?
Cut slowly and firmly through all three tissue layers in Step 4, leave the two-inch gap as instructed in Step 5 but wrap the outer edges tightly and add extra clear tape over the seam in Step 7 to prevent leaks, and keep paint very thin in Step 11 so the paper doesn't weaken.
How can I adapt this activity for preschoolers versus older kids?
For preschoolers, have an adult pre-cut the star donut in Step 4 and let them stuff and smooth in Step 8 while supervising tape in Steps 5 and 7, and for older kids let them add extra tissue layers in Step 3, experiment with denser stuffing in Step 6 for a firmer squishy, and paint finer sprinkles in Step 12.
How can we make the sour patch star donut more special or long-lasting?
Personalize it by tucking a small scented cotton ball (a drop of vanilla) inside when stuffing in Step 6, add glitter glue or tiny sequins over the paint in Step 12 for sparkle, or tape a ribbon loop into the seam in Step 7 to hang the finished squishy.