#PhotoFestival21 - Day 10 : Up
Take five photos looking upward: sky, tree canopy, tall building, ceiling patterns, and a close up of leaves, then make a collage showing perspective differences.


Step-by-step guide to #PhotoFestival21 - Day 10: Up
Photosynthesis 🌷 | What is photosynthesis? | Step-by-step process
Step 1
Ask an adult for permission and tell them where you will go to take your photos.
Step 2
Stand in a safe spot and point your camera or phone straight up to take a photo of the sky.
Step 3
Stand under a tree and aim your camera up through the branches to take a photo of the tree canopy.
Step 4
Stand at the base of a tall building and look up with your camera to take a photo that shows how tall it is.
Step 5
Go indoors and point your camera up at the ceiling to take a photo of any patterns lights or beams make.
Step 6
Hold your camera close to a leaf and take a close-up photo from below to show veins and details.
Step 7
Look through your five photos and pick the clearest most interesting photo for each subject.
Step 8
Decide whether you will make a paper collage or a digital collage.
Step 9
If you chose a paper collage ask an adult to help print your photos and then cut each photo into neat shapes.
Step 10
If you chose a digital collage open a collage app or photo editor and import your five chosen photos.
Step 11
Arrange the five photos on your paper or in the app so the different perspectives (close big vs distant small) are easy to see.
Step 12
Fix the photos in place by gluing or taping them down or by saving/exporting your digital collage.
Step 13
Add a title or small labels using markers or the app text to explain each perspective.
Step 14
Share your finished creation on DIY.org
Help!?
If I don't have a printer or a collage app, what can I use instead to finish the collage step?
If you don't have a printer or app, skip printing by making a paper collage directly from your phone screen (trace shapes onto paper and cut them) or use a library/print shop to print the five chosen photos for cutting and gluing.
My photos are coming out blurry when I point the camera straight up or take a close-up of a leaf—how can I fix that?
To avoid blur when pointing up or doing leaf close-ups, steady your camera or phone on a flat surface or against a wall, tap the screen to lock focus on the branches or leaf veins, and increase daylight or use a flashlight before retaking the photo.
How can I change this activity to suit a 4-year-old, an 8-year-old, or a 12-year-old?
For a 4‑year‑old, have an adult hold the camera, choose the clearest photo, and help glue pre-cut shapes; for an 8‑year‑old let them take the five photos and cut simple shapes with supervision; for a 12‑year‑old encourage using a collage app to arrange photos, add labels with the app text, and export for sharing on DIY.org.
What are some fun ways to extend or personalize the collage after I've glued or saved the five photos?
Personalize your collage by adding a title and small labels with markers or app text explaining each perspective, experiment with different times of day to retake the same five shots, or add drawings and stickers around each photo before sharing on DIY.org.
Watch videos on how to #PhotoFestival21 - Day 10: Up
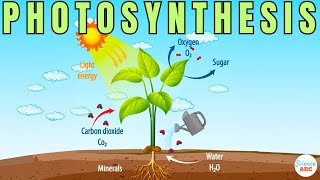
Photosynthesis
4 Videos
Photosynthesis

Photosynthesis: Crash Course Biology #8
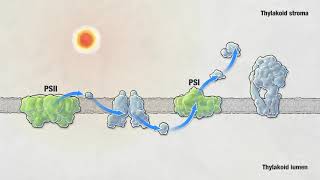
Photosynthesis | HHMI BioInteractive Video
Photosynthesis: The Biochemistry Behind How Plants Make Their Food
Facts about photography for kids
🌌 The sky looks blue because tiny air molecules scatter shorter (blue) wavelengths more than red (Rayleigh scattering).
🌳 The forest canopy acts like its own bustling ecosystem, home to many plants, insects, and animals you rarely see from the ground.
🏙️ Shooting from below is called a "worm's-eye view" — it makes buildings and trees look taller and more dramatic.
🔬 A close-up of a leaf can reveal veins and stomata, tiny pores plants use to exchange gases and 'breathe'.
✂️ Collage was popularized by artists like Pablo Picasso and Georges Braque in the early 20th century, mixing materials for fresh perspectives.
How do you do the #PhotoFestival21 Day 10 'Up' activity with kids?
What materials do I need for the 'Up' photos and collage?
What ages is this 'Up' photography activity suitable for?
What are the benefits and variations of the 'Up' photo collage activity?
