Make beats with a custom music interface
Design and build a simple custom music interface using buttons and a small board or tablet, then create and record original rhythmic beats.


Step-by-step guide to make beats with a custom music interface
FL Studio 12 - How to Make Beats [Beatmaking Tutorial]*
Step 1
Lay out all your materials on a clean table so you can see everything clearly.
Step 2
Pick how many buttons you want to use for different sounds (try 4 buttons to start).
Step 3
Cut or choose a piece of cardboard or a small box to be your button base.
Step 4
Mark where each button will go on the base with the marker so they are easy to reach.
Step 5
Attach each button to the base using tape or hot glue so they stay in place.
Step 6
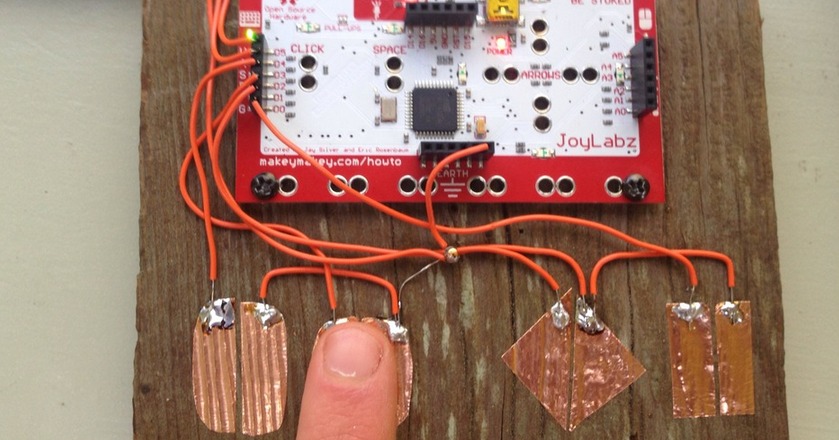
Connect one wire from one side of each button to a separate input pin on your board and connect the other side of each button to the board ground following your board’s wiring diagram.
Step 7
Turn on your tablet or board and open the sound-mapping app or code editor you will use for the interface.
Step 8
Assign each button input to a different percussion sound or sample in the app or in your code.
Step 9
Test each button one at a time to make sure it plays the correct sound and fix any loose wires.
Step 10
Arrange the buttons so they are comfortable to tap and label each button with the marker if you want.
Step 11
Practice pressing the buttons in a repeating sequence to make a rhythmic pattern and try different tempos.
Step 12
Record a short 30 to 60 second beat using the tablet or board’s recording feature while you play your pattern.
Step 13
Listen to the recording and adjust the sounds or tempo until you are happy with your beat.
Step 14
Save your final recording and share your finished creation on DIY.org
Help!?
What can I use if I don't have hot glue or tape to attach the buttons to the cardboard base?
Use double-sided tape, Velcro strips, reusable sticky tack, or small staples as alternatives to hot glue or regular tape to attach each button to the cardboard base so they stay in place.
A button isn't making sound — what's the quickest fix?
If a button doesn't play the correct sound, check that one wire from that button goes to its assigned input pin and the other to the board ground per the wiring step, then re-strip, retighten, or re-tape any loose wires and test the button one at a time.
How can I adapt this activity for different ages or skill levels?
For younger kids, use only 2–3 large taped buttons and preloaded sounds on the tablet, while older kids can try 4+ buttons, map custom samples in the code editor, and make firmer wire connections to the board.
How can we extend or personalize the beat-making project after recording?
Enhance the project by assigning layered samples per button in the app, adding LEDs to provide visual feedback when taps register, recording multiple takes to mix different tempos, and then saving and sharing the favorite version on DIY.org.
Watch videos on how to make beats with a custom music interface
How to Beatbox | Beatboxing For Beginners | Fun Activities For Kids
4 Videos

How to Beatbox | Beatboxing For Beginners | Fun Activities For Kids
![FL Studio 11 - How to Make a Beat [Beat Making Tutorial]](https://img.youtube.com/vi/x4XkQtpyWxM/mqdefault.jpg)
FL Studio 11 - How to Make a Beat [Beat Making Tutorial]

CBeebies Makes | How to make a music kit

Learn How to Beatbox | Activities for Kids | GoNoodle
Facts about music technology for kids
🥁 The Roland TR-808 drum machine (1980) shaped the sound of hip-hop and electronic music for decades.
🎛️ MIDI (Musical Instrument Digital Interface), introduced in 1983, lets instruments and computers send musical messages to each other.
🔌 Arduino boards can read button presses and sensors to trigger sounds, making them ideal for DIY music interfaces.
🎧 Tempo matters: many dance beats sit around 120–130 BPM, while hip-hop often ranges 70–100 BPM—tempo changes the groove.
🧠 Playing and creating rhythms activates both brain hemispheres and can boost timing, memory, and coordination.
How do you design and build a simple custom music interface to make beats?
What materials do I need to build a kid-friendly music interface for making beats?
What ages is this beat-making interface activity suitable for?
What are the benefits and safety tips for children making beats with a custom music interface?
