Make a travel journal
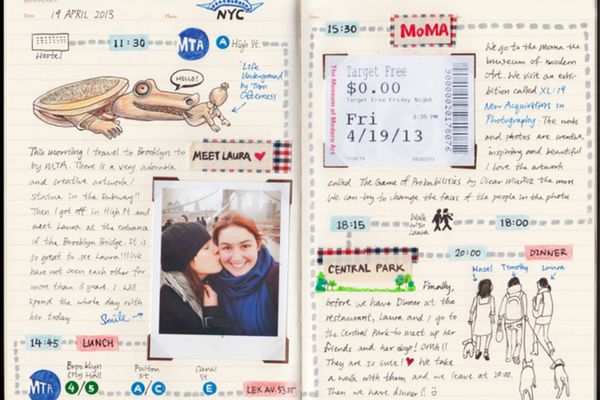
Make a personalized travel journal using paper, stickers, maps, and drawings to record routes, observations, souvenirs, and memories during trips.
About this activity
Make a personalized travel journal using paper, stickers, maps, and drawings to record routes, observations, souvenirs, and memories during trips.
What you need
Step by step
- 1
Step 1
Gather all your materials and put them on a clear table or desk.
- 2
Step 2
Decide how big you want your journal pages to be and stack that many plain sheets together.
- 3
Step 3
Cut a piece of construction paper or cardstock to match the page size to make a cover.
- 4
Step 4
Place the cover on top of the stacked pages so the edges line up.
- 5
Step 5
Bind the pages by stapling along the left edge twice or by punching holes and tying with string.
- 6
Step 6
Write a fun title on the front cover with your pencil or colouring materials.
- 7
Step 7
Decorate the cover using stickers and colouring materials.
- 8
Step 8
Turn to a fresh page that will be your travel route page.
- 9
Step 9
Glue or tape a printed map onto the route page or draw your travel route with pencil and colouring materials.
- 10
Step 10
Label several pages with headings like Routes Observations Souvenirs Memories and Drawings.
- 11
Step 11
Attach an envelope or sealable bag to one page to make a pocket for small souvenirs.
- 12
Step 12
Write your first journal entry with the date and one or two observations or drawings from your trip.
- 13
Step 13
Take photos of your finished travel journal and share your creation on DIY.org
Fun facts
How do I make a travel journal with my child?
Start with a small notebook, sketchbook, or a stack of paper bound together. Let your child decorate the cover with stickers, drawings, and their name. Divide pages into sections for routes, daily observations, sketches, and souvenirs. During the trip, encourage short entries, quick sketches, and attaching tickets or leaves. Keep a tiny travel kit with pens, glue stick, and stickers, and set aside 10–20 minutes each day to record memories together.
What materials do I need to make a personalized travel journal?
Gather a notebook or loose paper you can bind, pens, colored pencils or markers, stickers, and a glue stick or tape. Include small envelopes or zip-top bags for souvenirs, printed maps or map snippets, washi tape, scissors, and labels. A camera or phone for photos, a pencil sharpener, and a resealable pouch to store supplies on the go are helpful. Optional: a hole punch and ribbon to make a simple handmade binding.
What ages is a travel journal suitable for?
Travel journals can be adapted for many ages: 3–5 year olds enjoy scribbling, sticking souvenirs, and simple drawings with adult help. Ages 6–8 can draw scenes, write short sentences, and paste tickets. Ages 9–12 can plan routes, write longer entries, and add maps or charts. Teens can design layouts, scrapbook photos, and reflect more deeply. Supervision varies by age; younger children need help cutting, gluing, and writing.
What are the benefits of making a travel journal with kids?
Keeping a travel journal boosts observation, language, and memory skills while encouraging creativity and fine motor development. It helps children process experiences, practice storytelling, and learn basic map reading and sequencing. Journaling also strengthens family bonds as you share highlights and reflections. Over time the journal becomes a tangible keepsake that preserves memories and shows progress in writing and drawing abilities.
Watch & Learn
Need help?
What can we use instead of construction paper or cardstock for the cover if we can't find them?
If you can't find construction paper or cardstock for the cover, cut and decorate a flattened cereal box or glue two sheets of printer paper together to match the page size and use that as the cover.
What should we do if the staples won't hold the stacked pages together or the spine feels loose?
If stapling along the left edge twice doesn't hold the stacked pages, punch holes and tie with strong string as instructed or reinforce the spine with clear packing tape before decorating the cover.
How can we adapt the steps for younger or older kids so the activity is safe and engaging?
For preschoolers, have an adult pre-cut and stack the plain sheets and let them decorate the cover with stickers and colouring materials, while older kids can cut the cover, draw detailed travel routes on the route page, and bind the journal themselves with punched holes and string.
What are simple ways to extend or personalize the travel journal after it's finished?
To personalize and extend the journal, attach photos and ticket stubs into the sewn or glued envelope pocket, add labeled pages like Memories and Drawings as listed in the instructions, and decorate the cover with a unique title and washi tape.