Make a solar viewer
Build a simple pinhole solar viewer from cardboard, foil, and white paper to safely observe the Sun’s shape and sunspots indirectly.
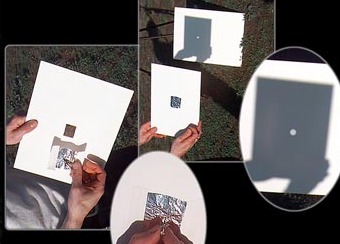
About this activity
Build a simple pinhole solar viewer from cardboard, foil, and white paper to safely observe the Sun’s shape and sunspots indirectly.
What you need
Step by step
- 1
Step 1
Ask an adult to help you make a safe solar viewer.
- 2
Step 2
Gather all the materials on a clean table so everything is ready.
- 3
Step 3
Use a pencil and ruler to mark a centered 3 cm square near the top of one side of the box.
- 4
Step 4
Carefully cut out the marked square with scissors or a craft knife while your adult helps.
- 5
Step 5
Tape a piece of aluminum foil over the hole so the foil covers the opening and is smooth.
- 6
Step 6
Use a pin to poke a tiny hole about 1 millimeter in the center of the foil.
- 7
Step 7
Tape a sheet of white paper inside the box directly opposite the foil to make a flat projection screen.
- 8
Step 8
Close or cover any other openings so the inside of the box is as dark as possible.
- 9
Step 9
Go outside with your adult helper.
- 10
Step 10
Stand with your back to the Sun.
- 11
Step 11
Point the foil side of the box toward the Sun and hold the box steady.
- 12
Step 12
Look into the open end of the box to see the Sun’s image projected on the white paper.
- 13
Step 13
Slowly tilt or move the box until the projected image looks sharp and you can spot sunspots.
- 14
Step 14
Share your finished solar viewer and what you saw on DIY.org
Fun facts
How do you make a pinhole solar viewer to observe the Sun safely?
Cut a small square opening in one end of a cardboard box and tape aluminum foil over it. Carefully poke a tiny, smooth pinhole in the foil with a needle. Tape a sheet of white paper to the inside opposite end to act as a screen. Point the foil end toward the Sun (never look directly at it); the sunlight passing through the pinhole will project the Sun’s image and sunspots onto the paper. Move the screen to adjust focus.
What materials do I need to build a simple pinhole solar viewer?
You’ll need a small cardboard box (shoebox or cereal box), a piece of aluminum foil, white paper for the screen, tape or glue, a needle or pin to make the pinhole, scissors or a craft knife (adult use), and a ruler or pencil to mark holes. Optional: black paint or marker to reduce internal glare and clipboard or paperclip to hold the screen steady.
What ages is this pinhole solar viewer activity suitable for?
This activity is great for children about 6 years and older with adult guidance; younger children (4–5) can participate with closer supervision. Older kids and teens can build it almost independently, especially for measuring and fine adjustments. Adult help is recommended for cutting cardboard and making the pinhole, and to reinforce safety rules about never looking directly at the Sun.
What safety precautions should I follow when using a pinhole solar viewer?
Always supervise and remind children never to look through the pinhole or directly at the Sun. Use the viewer only for indirect projection on the paper screen. Adults should handle sharp tools and inspect the viewer for light leaks or damage. Never substitute binoculars, telescopes, or cameras with a pinhole—those can concentrate sunlight and cause injury. Store safely after use and dispose of foil or sharp bits responsibly.
Watch & Learn
Need help?
What can I use if I can't find aluminum foil for covering the cut square?
If you don't have aluminum foil, use a flattened, cleaned piece of a soda can or heavy-duty kitchen foil taped over the 3 cm cut square and smooth it before poking the ~1 mm hole with the pin or a thumbtack.
Why is the Sun's image faint or blurry and how do I fix it?
If the projected image is faint or blurry, make sure the foil over the marked 3 cm square is smooth with a tiny ~1 mm pinhole, the white paper is taped flat directly opposite the foil, and all other openings are closed so the box interior is dark before you stand with your back to the Sun and re-aim the box.
How can I change the activity for younger or older kids?
For younger children, have an adult do the ruler marking, cutting of the 3 cm square, and poking of the 1 mm hole while the child tapes the foil and white paper and watches the projection, and for older kids let them measure and test different pinhole sizes or add extra foil layers to compare image sharpness.
What are some ways to extend or personalize the solar viewer after it's working?
To extend the activity, decorate the outside of the box, attach a cardboard stand to keep the box steady while you point the foil side toward the Sun, experiment with different pinhole sizes or a second box to change image size, and trace or photograph the Sun's image on the taped white paper to record sunspots for sharing on DIY.org.