Make a paper clay sculpt
Make a small paper clay sculpture by mixing paper pulp and glue, shaping forms, then drying and painting to explore texture and creativity.
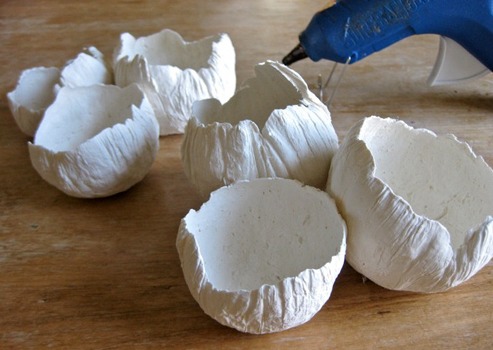
About this activity
Make a small paper clay sculpture by mixing paper pulp and glue, shaping forms, then drying and painting to explore texture and creativity.
What you need
Step by step
- 1
Step 1
Tear the scrap paper into small pieces about the size of a postage stamp using your hands.
- 2
Step 2
Put the paper pieces into the bowl and pour in enough water to completely cover them.
- 3
Step 3
Let the paper soak for 20 to 30 minutes so the fibers soften and break down.
- 4
Step 4
Mash the soaked paper with your hands or the spoon until it becomes a fibery pulp.
- 5
Step 5
Scoop the pulp into the cheesecloth and squeeze firmly to remove excess water until the pulp is damp but not dripping.
- 6
Step 6
Add white glue to the drained pulp at about half the pulp volume and mix with the spoon until it becomes a claylike paste.
- 7
Step 7
Knead the pulp mixture with your hands for 1 to 2 minutes until it feels smooth and holds together.
- 8
Step 8
Place the mixture on the wax paper or cardboard base and shape your small sculpture using only your hands.
- 9
Step 9
Use a toothpick or fork to add texture and details to your sculpture.
- 10
Step 10
Put the sculpture in a warm dry place and leave it to air dry until hard which can take 24 to 72 hours.
- 11
Step 11
Paint your dried sculpture with thin coats of paint using the brush.
- 12
Step 12
Let the paint dry completely before touching or displaying your sculpture.
- 13
Step 13
Share your finished paper clay sculpture on DIY.org
Fun facts
How do you make a paper clay sculpture?
To make a paper clay sculpture, tear scrap paper into small pieces and soak in warm water until pulpy. Blend or mash the pulp, then squeeze out excess water. Mix pulp with white PVA glue (about two parts pulp to one part glue) until it holds together. Shape by hand or around a simple armature, smooth seams with damp fingers, then let dry completely (24–72 hours) before sanding and painting with acrylics.
What materials do I need for paper clay sculpting?
You’ll need scrap paper (newspaper, tissue, or office paper), a blender or bowl and masher, white PVA glue, water, mixing bowl, and measuring tools. Add disposable gloves, a nonstick surface or wax paper, simple armature supplies (cardboard, foil, or wire), sculpting tools like toothpicks or plastic knives, sandpaper, and acrylic paints and brushes for finishing. Optional: clear varnish or sealant to protect the painted piece.
What ages is this paper clay activity suitable for?
This craft suits children about 5 years and up with adult help. Ages 5–7 enjoy tearing, mixing, and basic shaping with supervision for glue and drying. Ages 8–12 can manage more detailed forms, simple armatures, and painting. Teens can explore complex textures and techniques. Always supervise younger kids for choking risks, scissors, and small armature parts, and adapt tools and expectations to each child’s skill level.
What are the benefits and safety tips for paper clay sculpting?
Paper clay sculpting improves fine motor skills, creativity, problem-solving, and patience while being affordable and eco-friendly. It encourages sensory exploration of texture and form and boosts confidence in making art. Safety tips: choose non-toxic PVA glue and acrylic paints, work in a well-ventilated area, supervise to prevent ingestion of pulp, avoid sharp armature pieces for young children, and ensure sculptures dry completely before sanding or painting. Store leftover pulp chilled and c
Watch & Learn
Need help?
What can I use instead of cheesecloth or white glue if I can't find those materials?
If you don't have cheesecloth for step 5, squeeze the pulp in a thin cotton dish towel, old T-shirt, or fine-mesh strainer, and if white glue for step 6 is unavailable use another PVA/school glue or a cooked flour paste at a similar volume ratio.
My pulp won't hold together or my sculpture collapses while shaping — what can I do?
If the mixture won't hold in step 7 or collapses during shaping in step 8, squeeze more water out in step 5, add a little more white glue in step 6, and knead the pulp longer before shaping.
How can I adapt this paper-clay process for different ages or skill levels?
For younger kids (3–5) tear larger paper pieces in step 1 and have an adult complete soaking and draining (steps 2–5) while they press and texture damp pulp on the base (steps 7–9), and for older kids (8+) encourage longer kneading in step 7 and adding wire armatures before shaping in step 7 for taller pieces.
What are simple ways to extend or personalize the sculpture once the basic shape is done?
To personalize and enhance the project, press found objects or beads into the pulp while shaping (step 8), stir a little acrylic paint into the pulp at step 6 for colored clay, and after the sculpture dries (step 10) apply a clear sealer and then paint in thin coats (step 11) for durability and detail.