Make a littleBits art bot
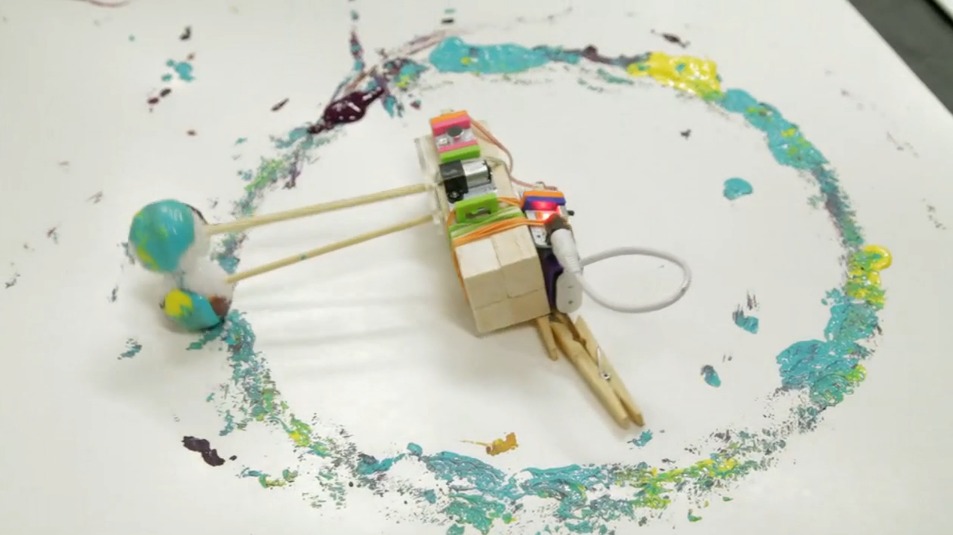
Build a littleBits art bot that moves a marker to draw colorful patterns on paper, using motors, sensors, and simple circuits to explore creativity.
About this activity
Build a littleBits art bot that moves a marker to draw colorful patterns on paper, using motors, sensors, and simple circuits to explore creativity.
What you need
Step by step
- 1
Step 1
Clear a flat workspace and place all your materials where you can reach them.
- 2
Step 2
Tape a sheet of paper firmly to the cardboard base so it cannot move.
- 3
Step 3
Snap the littleBits together in this order: Power to Button to Slide Dimmer to Motor.
- 4
Step 4
Turn the Power bit ON so the circuit is ready.
- 5
Step 5
Place the motor on the cardboard near the paper edge and tape the motor body down so it will not slide.
- 6
Step 6
Attach a craft stick to the motor hub using tape and a rubber band so the stick will spin when the motor runs.
- 7
Step 7
Tape the marker to the outer end of the craft stick so the tip points down and just barely touches the paper.
- 8
Step 8
Adjust the marker angle or move the paper until the marker tip lightly drags and leaves a mark.
- 9
Step 9
Press the Button bit to start the motor and watch the marker draw on the paper.
- 10
Step 10
Slide the Dimmer bit to change the motor speed and create different drawing patterns.
- 11
Step 11
Share your finished art bot creation on DIY.org.
Fun facts
How do you build a littleBits art bot that draws patterns?
To build a littleBits art bot, start by planning the motion (spinner, wobble, or servo sweep). Snap together power → on/off or button → pulse or dimmer → motor or servo. Mount a marker to a lightweight arm (popsicle sticks, zip-ties) and attach the arm to the motor shaft. Place paper on a flat base and secure the bot. Adjust motor speed or servo angle to change patterns, then test and iterate until you get colorful designs.
What materials do I need for a littleBits art bot?
Materials: littleBits modules (Power/battery, On/Off or Button, Pulse or Dimmer, Motor or Servo; optional Oscillator, Vibration, Light/Sound sensors), markers, sturdy cardboard or plastic base, paper, popsicle sticks, rubber bands, tape, zip ties, small screws or mounting hardware, scissors, and a protective mat. Optional extras: extra markers, masking tape for pen placement, and a cloth to wipe marker ink.
What ages is a littleBits art bot activity suitable for?
Suitable for children roughly 7–13 years old. Kids ages 7–9 enjoy hands-on building with guidance, while 10–13-year-olds can design more complex circuits and patterns independently. Younger children (5–6) can participate with close adult supervision for small parts and tools. Always consider your child’s fine motor skills, attention span, and comfort with simple electronic components before starting.
What are the benefits and safety tips for making a littleBits art bot?
Benefits include learning basic circuitry, cause-and-effect, creativity, iterative design, fine motor skills, and problem-solving as kids tweak speed, arm length, and pen placement. Safety tips: supervise small parts and tools, use low-voltage littleBits modules only, secure loose hair and clothing, and protect surfaces from marker stains. Encourage experimentation by changing pen angles or adding sensors to explore new patterns.
Watch & Learn
Need help?
What can we use if we don't have the littleBits Power, Button, Slide Dimmer, or Motor?
If you don't have littleBits, substitute a small DC motor taped to the cardboard, a battery pack with an on/off switch in place of Power and Button, and a simple potentiometer for the Slide Dimmer while keeping the same steps for attaching the craft stick and marker.
Why won't the marker draw or the motor spin and how can we fix it?
If the motor doesn't spin, first confirm the Power bit is ON and all littleBits are snapped together snugly, then make sure the motor body is firmly taped to the cardboard, the rubber band holds the craft stick to the motor hub tightly, and the marker tip just barely touches the paper as instructed.
How can we adapt this art bot activity for different ages?
For younger children, pre-assemble the littleBits, use a washable thick marker and larger cardboard base for easier handling, and for older kids let them experiment with multiple markers or build a sturdier motor mount using a hot-glued motor body.
How can we extend or personalize our art bot to make more interesting drawings?
Customize patterns by decorating the cardboard base, attaching multiple markers or differently sized craft sticks, and using the Slide Dimmer to vary motor speed while sharing favorite creations on DIY.org as suggested.