Make a custom texture pack in minecraft
Create a custom Minecraft texture pack by editing images, resizing pixels, and replacing game files, then test your textures while learning digital art basics.


Step-by-step guide to make a custom Minecraft texture pack
How to MAKE TEXTURE PACKS in Minecraft Bedrock (2025) [Easy & Free!]
Step 1
Make a backup by copying your Minecraft "versions" folder and saving that copy somewhere safe so you can restore Minecraft if anything goes wrong.
Step 2
Open Minecraft Options then Resource Packs then click Open Pack Folder and create a new folder named MyTexturePack inside the resourcepacks folder.
Step 3
In your MyTexturePack folder create a new text file called pack.mcmeta and paste this template exactly: {"pack":{"pack_format":9,"description":"My Custom Texture Pack"}} then save the file.
Step 4
Inside MyTexturePack make these folders in this order: assets then inside it make minecraft then inside that make textures and then subfolders like blocks or items you want to edit.
Step 5
Find your Minecraft version .jar in the versions folder open it with your zip tool and copy the files you want from assets/minecraft/textures into the matching folders inside MyTexturePack/assets/minecraft/textures.
Step 6
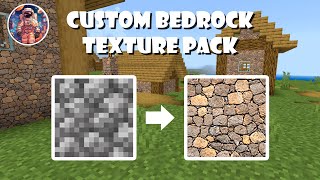
Open one of the PNG texture files you copied into your image editor so you can see its pixels clearly.
Step 7
Use the pencil tool set to 1px and change the individual pixels to make your design while keeping the image exactly the same width and height.
Step 8
Save the edited PNG using the same filename and PNG format making sure transparency is preserved if the texture used it.
Step 9
Repeat Steps 6–8 for any other textures you want to customize.
Step 10
Start Minecraft, go to Options then Resource Packs, find MyTexturePack and move it into the Selected packs list, then click Done to load it.
Step 11
Open or create a world and look at the blocks and items you changed to see your new textures in the game.
Step 12
If a texture looks wrong, close Minecraft, edit that texture PNG again in your image editor, save it, then reopen Minecraft to check the fix.
Step 13
Share your finished texture pack and screenshots of your creations on DIY.org to show your friends and get feedback.
Help!?
What can we use if we don't have a zip tool or an image editor that supports PNG transparency?
If you don't have a zip tool or PNG editor, open the Minecraft version .jar from the versions folder with a free utility like 7-Zip and edit textures in a free PNG-capable editor such as GIMP or Paint.NET so you can follow Steps 5 and 7 while keeping transparency.
Why won't my texture pack show up or why do textures look wrong after loading it?
Check that pack.mcmeta exactly matches the template in Step 3, that your MyTexturePack folder follows the assets/minecraft/textures structure from Step 4, that copied filenames and image dimensions were not changed in Step 7, then restart Minecraft and reload the pack in Step 9.
How can I adapt this activity for younger children or older kids?
For younger kids, have an adult handle backing up the versions folder and Steps 2–5 while the child paints larger edits on copied PNGs in Step 7; for older kids, encourage pixel-by-pixel edits (Step 7), customizing many textures via Steps 6–8 and testing in Step 9.
What are good ways to extend or personalize the texture pack after finishing the basic edits?
Create a cohesive theme by editing multiple files with Steps 6–8, preserve transparency for layered effects, take screenshots in Step 11, and share the finished MyTexturePack and screenshots on DIY.org as suggested in Step 12 for feedback.
Watch videos on how to make a custom Minecraft texture pack
How to Create Your Own EPIC Texture Pack in Minecraft Bedrock 1.20 - Easy Guide!
4 Videos
How to Create Your Own EPIC Texture Pack in Minecraft Bedrock 1.20 - Easy Guide!
Make Your Own CUSTOM Minecraft Texture Pack in Under 5 Minutes
How To Make A Texture Pack In Minecraft 1.21 - Resource Pack Tutorial
How to Create Your Own MINECRAFT TEXTURE PACK in 2024! (Super Easy Guide)
Facts about pixel art and game modding
🎮 Minecraft has sold over 200 million copies worldwide, making it one of the best‑selling video games ever.
🧩 Minecraft resource packs can change textures, sounds, fonts, models, and even language files — not just pictures.
🎨 The game's default textures are 16×16 pixels, so creating Minecraft art is a fun exercise in tiny-scale pixel art.
🖼️ Minecraft textures use PNG files with transparency, which lets you make cutouts and layered designs.
📁 To use a custom texture pack you place its ZIP or folder in the game's "resourcepacks" folder and enable it in settings.
How do you create a custom Minecraft texture pack step by step?
What materials and software do I need to make a Minecraft texture pack?
What ages is making a Minecraft texture pack suitable for?
What are the benefits of making a custom Minecraft texture pack for kids?
