Make a beekeeping suit
Make a simple, safe beekeeping suit using white clothing, mesh veil, elastic, and gloves; learn about protection and bee safety with adult help.
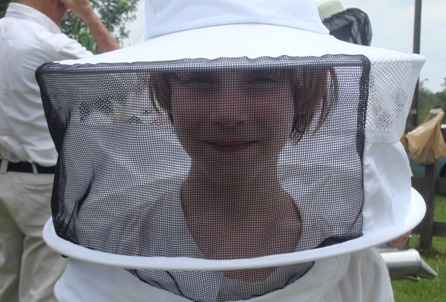
About this activity
Make a simple, safe beekeeping suit using white clothing, mesh veil, elastic, and gloves; learn about protection and bee safety with adult help.
What you need
Step by step
- 1
Step 1
Put on the white long-sleeve shirt and pants to check that they fit comfortably and you can move your arms and legs easily.
- 2
Step 2
Put the white hat on and use the tape measure to measure the circumference where the mesh will sit and write the number down.
- 3
Step 3
Cut a piece of elastic to the measured length minus 2 centimeters so it will fit snugly around the hat.
- 4
Step 4
Lay the mesh flat and cut a rectangle about 25 to 35 centimeters tall and wide enough to go around the head when joined.
- 5
Step 5
With an adult's help, attach the elastic along one long edge of the mesh by sewing or using fabric glue so the mesh forms a loop that can slip over the hat brim.
- 6
Step 6
Pull the elastic-mesh loop over the hat brim so the mesh hangs down around your face and covers your neck area.
- 7
Step 7
Use safety pins or ask an adult to sew the bottom edge of the mesh to the inside of the shirt collar so the mesh sits snugly against your neck and chest without gaps.
- 8
Step 8
Put on the gloves and tuck each glove into the sleeve cuffs so the glove material meets the sleeve.
- 9
Step 9
Wrap a small piece of elastic around each wrist cuff to seal the gap between the glove and sleeve and secure with a stitch or a pin.
- 10
Step 10
Move your arms bend and turn your head to check visibility comfort and that nothing pulls or gaps while you move.
- 11
Step 11
Ask an adult to inspect every seam pin and elastic and to make any adjustments so the suit is safe and secure.
- 12
Step 12
Take a photo or write about your beekeeping suit and share your finished creation on DIY.org
Fun facts
How do you make a simple, safe kids' beekeeping suit?
Start with a white long-sleeve shirt and light-colored pants. Add a mesh veil over a baseball cap or hood, securing edges with elastic or Velcro to close gaps. Tuck pant legs into socks and sleeves into gloves, sealing with elastic bands. Test for comfortable movement and clear vision. Always build and fit the suit with an adult present, and practise calm movements near flowers before approaching any bees.
What materials are needed to make a child-friendly beekeeping suit?
You’ll need a white long-sleeve shirt, white pants, a fine mesh veil or mesh fabric, a cap or hood, elastic bands or Velcro, and close-fitting gloves. Optional: lightweight zippered jacket, ankle-high socks, and duct tape for temporary sealing. Use breathable fabrics and avoid bright patterns. Buy mesh made for beekeeping or repurpose mosquito netting; always inspect seams and secure openings with elastic or Velcro.
What ages is this beekeeping suit activity suitable for?
This activity is best for children aged about 6 and up with close adult supervision. Younger kids (6–8) can help with simple tasks like choosing fabric and testing fit; older children (9–12+) can help measure, cut mesh, and fasten elastic with assistance. Because of tools and bee safety, an adult should handle any cutting, attaching, and all interactions with live bees.
What are the benefits and safety tips for kids making a beekeeping suit?
Benefits include learning about bee safety, responsibility, and practical sewing or crafting skills. It reduces sting risk by covering skin and teaches calm behavior around insects. Safety tips: always work with an adult, check for allergies before any bee exposure, ensure snug closures to prevent gaps, and practise non-threatening movements. Variations include using a full hood or detachable veil and lighter fabrics for hot weather.
Watch & Learn
Need help?
If I can't find the specific mesh, elastic, or fabric glue named in the instructions, what can I use instead?
Use fine mosquito netting or bridal tulle in place of the beekeeping mesh and cut it to the same 25–35 cm rectangle in step 4, replace elastic with a braided cord or an old hatband cut to the measured length minus 2 cm from step 3, and swap fabric glue for clear craft glue or use small hand stitches when attaching in step 5.
What should I do if the mesh loop keeps sliding off the hat or gaps appear at the collar when the child moves?
If the elastic-mesh loop slides off after step 5, shorten the elastic by 1–2 cm and add several small stitches or more glue along the seam, and if gaps appear at the collar after step 6 or while testing movement in step 11, re-pin the mesh closer together and have an adult sew the bottom edge into the shirt collar to seal it.
How can I adapt the activity for different ages or skill levels?
For younger children have an adult do the measuring in step 2, pre-cut the mesh in step 4 and use safety pins instead of sewing in steps 5 and 6, while older kids can practise measuring, cutting, and sewing (steps 2–6) and test mobility themselves in step 11.
How can we improve or personalize the beekeeping suit after finishing it?
Personalize and enhance the suit by sewing a name patch or reflective tape onto the shirt, adding a small inside pocket before the adult inspection in step 12, double-layering the mesh for durability when cutting in step 4, or adding a zipper or snaps at the collar to make step 6 easier to inspect.