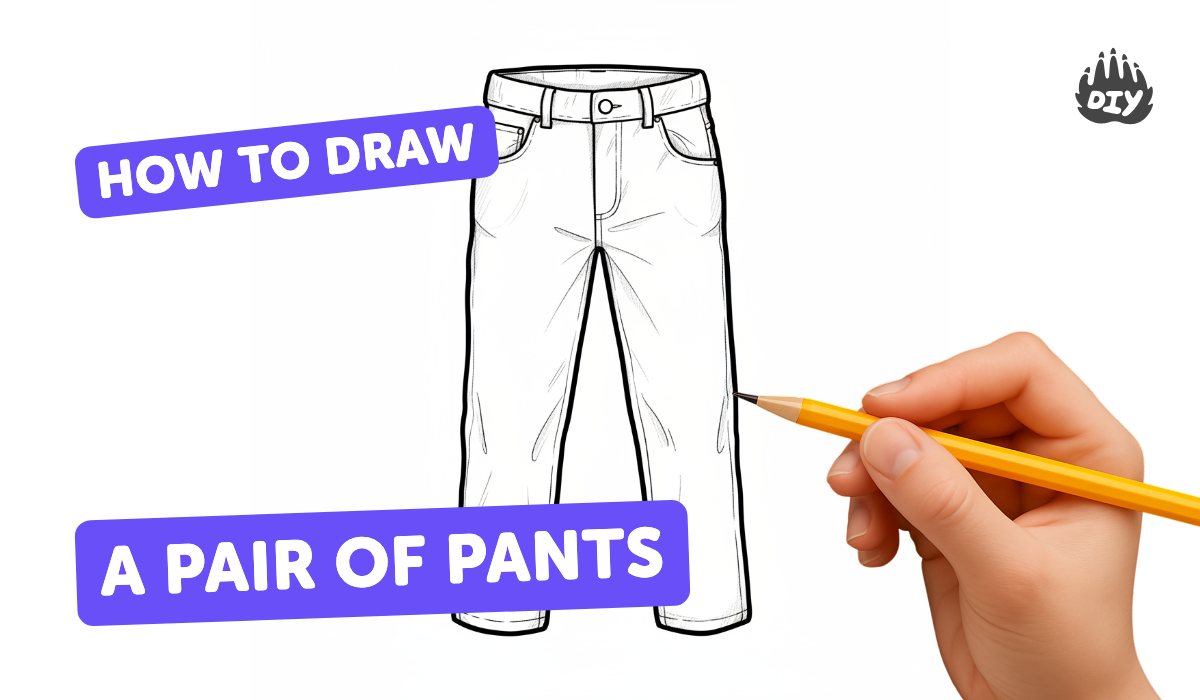
How to draw pants - a free pants drawing guide
Draw a pair of pants step by step, sketching shape, seams, and pockets. Practice shading, folds, and proportions to create realistic clothing.

Drawing Apps
Get inspired with these


Instructions
Easy Pants Drawing Tutorial for Kids - Step by Step Guide!
Step 1
Gather all your materials and place them on a flat table where you can draw comfortably.
Step 2
Lightly draw a horizontal waist guide near the top of the paper and a horizontal ankle guide near the bottom.
Step 3
Draw two slightly curved vertical lines from the waist guide down to the ankle guide to make the basic pant leg outlines.
Step 4
Draw a curved crotch line connecting the two leg outlines to shape the pants at the top center.
Step 5
Draw a rectangle along the waist guide to create the waistband.
Step 6
Add small rectangles or loops on top of the waistband to make belt loops.
Step 7
Draw a slanted pocket line on each hip to show pocket openings.
Step 8
Add seam lines by drawing a straight line down the outer side of each leg and a center seam if you like.
Step 9
Draw short curved fold lines near the knees and crotch to show fabric bending and texture.
Step 10
Shade lightly along the inside of seams under the waistband and near folds using gentle pencil strokes to create shadow.
Step 11
Trace your favorite lines with a black marker and then erase any extra pencil guide marks.
Step 12
Share your finished pants drawing on DIY.org so everyone can see your cool creation.
Help!?
What can we use if we don't have a black marker or special drawing paper?
If you don't have a black marker, trace your favorite lines with a dark pen, fine-tip crayon, or thin felt-tip, and if you lack drawing paper use printer paper or a page from a sketchbook placed on a flat table, then erase pencil guide marks as instructed in the final step.
My pant legs look uneven—how can I fix them before I trace with marker?
If the pant legs look uneven, keep your pencil light and use the waist and ankle guides to measure and lightly redraw the two slightly curved vertical leg outlines so their lengths match before adding the crotch line and tracing.
How can I adapt this drawing for different age groups?
For younger children, simplify by drawing just the waist and ankle guides and the basic pant leg outlines with crayons and skip shading, while older kids can add belt loops, slanted pocket lines, center seams, fold lines near knees, and detailed shading as in steps 7–10.
What are some fun ways to personalize or extend the pants drawing?
After tracing and erasing guides, personalize the pants by adding patterns, patches, buttons or a zipper along the waistband, coloring with colored pencils, or turning the ankle guide into shorts or cuffs before sharing the finished pants drawing on DIY.org.
Related videos
How To Draw Pants Step By Step 👖 Pants Drawing Easy
3 Videos
How To Draw Pants Step By Step 👖 Pants Drawing Easy
How to Draw Pants Easy | Trousers Drawing Tutorial For Beginners
EASIEST Way To Draw Pants! Step By Step Tutorial - Follow Along! #drawingtutorial #shorts
Fun Facts
👖 Trousers are super old — archaeologists found pants on 3,000‑year‑old mummies in Central Asia!
✂️ The word "pants" comes from "pantaloons," a name for certain trousers that was popular centuries ago.
📏 When drawing people, legs are often about half the body's height — a handy rule for sketching pants proportions.
🧵 Pockets used to be separate pouches tied around the waist; sewn‑in pockets became common much later.
🎨 A few seam lines plus simple shading (think light source → shadow) can turn flat pants into a 3D, wrinkled-looking pair.
How do you draw pants step-by-step with a child?
What materials do I need to draw a pair of pants with kids?
What ages is this pants-drawing activity suitable for?
What are the benefits of drawing pants with children?
