How to Draw a Griffin
Draw a detailed griffin step by step using simple shapes, pencils, and shading techniques. Practice proportions, feathers, and fur to improve observational drawing skills.
About this tutorial
Draw a detailed griffin step by step using simple shapes, pencils, and shading techniques. Practice proportions, feathers, and fur to improve observational drawing skills.
What you need
Instructions
- 1
Step 1
Prepare your workspace by placing your paper on a flat surface and having a sharpened pencil ready.
- 2
Step 2
Lightly draw a circle for the griffin's head using gentle strokes.
- 3
Step 3
Lightly draw a larger oval below and slightly behind the head circle for the body.
- 4
Step 4
Draw a short curved line to connect the head and body to form the neck.
- 5
Step 5
Draw a vertical centerline on the head circle to guide facial placement.
- 6
Step 6
Sketch a hooked beak on the front of the head using two curved lines that meet at a point.
- 7
Step 7
Draw an almond-shaped eye on the centerline and add a small circle inside for the pupil.
- 8
Step 8
Add an ear tuft and mane fur behind the head using short jagged strokes.
- 9
Step 9
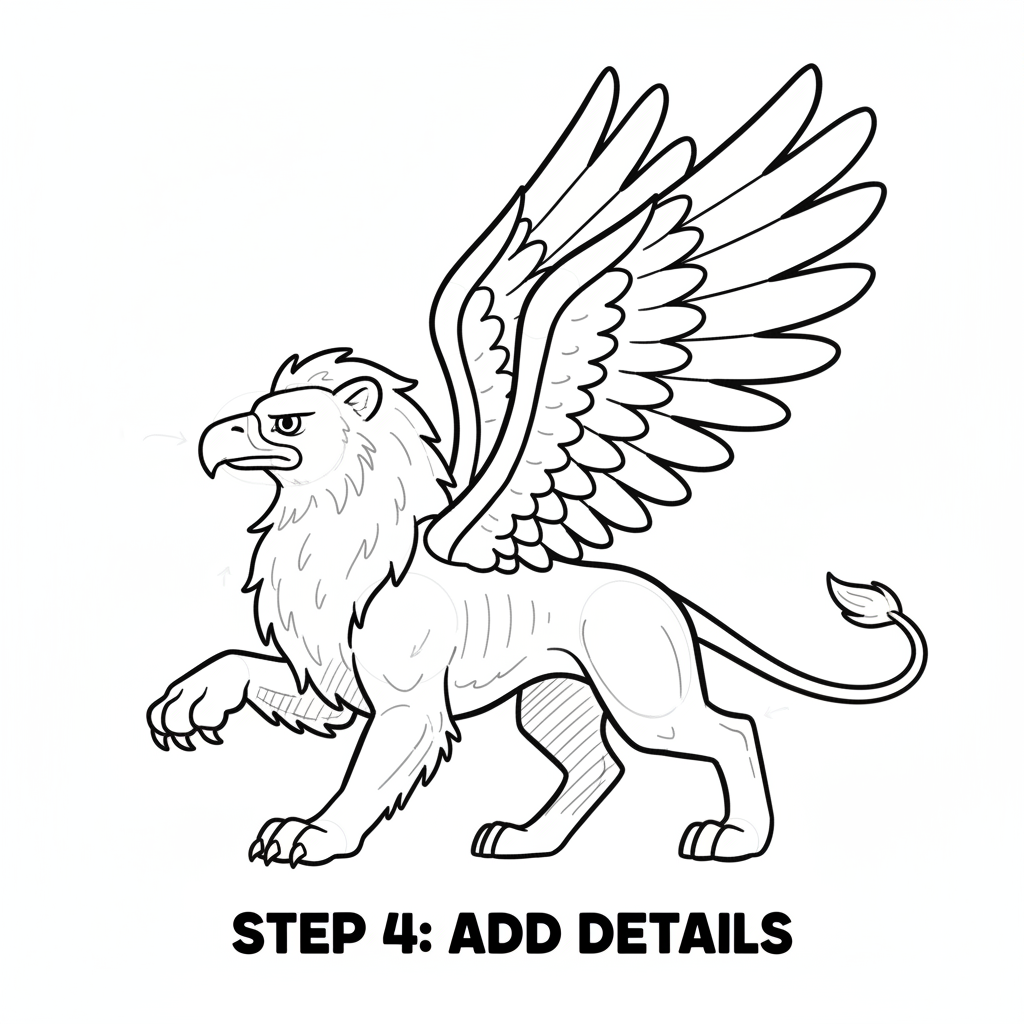
Sketch the front eagle-like legs with talons and the hind lion-like legs with paws using simple tube shapes.
- 10
Step 10
Draw a large wing shape attached at the shoulder and outline its sweep.
- 11
Step 11
Add layered curved lines on the wing and short strokes on the body to show feathers and fur texture.
- 12
Step 12
Shade areas that would be in shadow with a darker pencil and blend softly with the stump or tissue.
- 13
Step 13
Erase any extra construction lines to clean up your drawing and darken final outlines where needed.
- 14
Step 14
Share your finished griffin drawing on DIY.org.
Get inspired
Fun facts
How do I draw a detailed griffin step by step?
Start with simple shapes: draw an oval for the torso, a circle for the chest, and smaller circles for the head and joints. Sketch the eagle head and beak, then map out the lion’s body, legs, and tail. Add wing outlines using elongated ovals, then block in feather groups and fur tufts. Refine contours, erase construction lines, and add pencil shading for volume—use directional strokes for feathers and softer strokes for fur to emphasize texture and form.
What materials do I need to draw a griffin with shading?
You’ll need drawing paper (medium weight), a range of pencils (HB for construction, 2B–4B for shading), a kneaded eraser and a regular eraser, a pencil sharpener, and a blending stump or tissue for smooth gradients. Optional extras: reference images, colored pencils or ink pens for finishing, a ruler for measuring proportions, and a small sketchbook to practice different feather and fur patterns before committing to the final drawing.
What ages is drawing a detailed griffin suitable for?
This activity suits children roughly 7–14 years old; younger kids (5–7) can try simplified shapes and basic feather marks with adult help. Older children and teens can tackle realistic proportions, complex feather groups, and advanced shading techniques. Adjust expectations: beginners focus on simple shapes and light shading, while more experienced young artists practice texture, anatomy, and layered tones to build observational drawing skills.
What are the benefits of drawing a griffin for kids?
Drawing a griffin helps improve observational skills, hand-eye coordination, and fine motor control as children learn proportions, feathered texture, and fur rendering. It builds patience and problem-solving while encouraging creativity and storytelling. Practicing shading teaches light, form, and depth. The project also boosts confidence as kids see progress from simple shapes to a detailed creature, and it can be adapted for group activities or imaginative writing prompts.
Watch & Learn
Need help?
What can I use if I don't have a sharpened pencil or a blending stump mentioned in the instructions?
Use a mechanical pencil or a well-sharpened colored pencil for the light construction lines and substitute a clean cotton swab or a folded tissue for the blending stump when shading.
My hooked beak or neck looks wrong—what step should I fix first so the griffin's head and body look right?
Erase the beak and short curved neck line, then re-sketch the hooked beak using the head's vertical centerline for placement and reconnect the head circle to the body oval with a gently adjusted curved neck line before darkening outlines.
How can I adapt these drawing steps for younger kids or make it more challenging for older kids?
For younger kids simplify to a head circle, body oval, basic 'U' paws and a single wing outline, while older kids can add detailed talons and paws, layered curved feather lines on the wing, and blended shading with the stump or tissue.
What are easy ways to extend or personalize the griffin drawing after finishing the steps?
Add color with colored pencils or watercolor, invent patterned mane fur and feather colors, draw a rocky or sky background, and photograph the cleaned drawing to share on DIY.org.