#GroomYourRoom Day 4 : Study Desk
Organize and decorate your study desk by sorting supplies, labeling containers, arranging books, and creating a simple desk organizer to improve focus and neatness.


Step-by-step guide to organize and decorate your study desk
Photosynthesis 🌷 | What is photosynthesis? | Step-by-step process
Step 1
Clear your desk by taking everything off and putting the items on the floor or a nearby bed.
Step 2
Wipe the desk surface with a cloth so it is clean and ready to use.
Step 3
Sort your supplies into groups like pens pencils erasers clips and markers.
Step 4
Pick one container for each group and set the containers on the desk.
Step 5
Measure the height and width of a container and mark the decorative paper to fit using the ruler.
Step 6
Cut the decorative paper along your marks with scissors.
Step 7
Wrap the paper around the container and secure it with glue or tape.
Step 8
Write the name of each group on sticky notes or tape with the permanent marker and stick them to the matching container.
Step 9
Cut down the front of the shoebox to make a simple tray for notebooks and loose papers.
Step 10
Arrange the labeled containers the shoebox tray and your books on the desk so the things you use most are easy to reach.
Step 11
Add one small decoration like a drawing a photo or a plant to personalize your desk.
Step 12
Take a picture and share your finished study desk creation on DIY.org
Help!?
What can I use instead of decorative paper, sticky notes, or a shoebox if I can't find them?
Use newspaper, brown paper bags, or old wrapping paper cut to the container's measured height and width with the ruler, use masking tape or plain paper labels instead of sticky notes, and substitute a small cereal box or plastic tray for the shoebox when cutting down the front to make a tray.
My paper doesn't wrap around the container smoothly or the labels keep peeling off; how do I fix that?
Re-measure the container's height and width and cut the decorative paper slightly larger so it overlaps when you wrap and secure it with glue or double-sided tape, and reinforce labels by pressing sticky notes firmly or backing them with clear tape so they don't peel.
How can I adapt this desk project for younger children or teens?
For younger kids have an adult handle the ruler measurements, scissors cutting of decorative paper and the shoebox tray while the child sorts supplies and sticks pre-written labels, and for teens encourage precise measuring, finer decorative details with the permanent marker, and arranging items for ergonomic access.
How can I make my finished study desk more useful or creative beyond the basic instructions?
Create cardboard dividers inside containers for compartments, color-code the labels with markers, add a small plant or a clip-on LED for usability, and personalize each container with a drawing or photo before taking the DIY.org picture.
Watch videos on how to organize and decorate your study desk
Photosynthesis
4 Videos
Photosynthesis

Photosynthesis: Crash Course Biology #8
Photosynthesis | HHMI BioInteractive Video

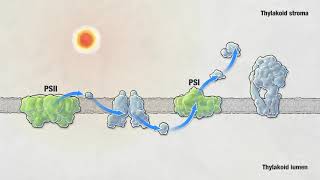
Photosynthesis - Light Dependent Reactions and the Calvin Cycle
Facts about study space organization for kids
🧹 A tidy desk helps your brain notice fewer distractions — many people say they focus better after a quick tidy-up.
📚 Arranging books by color, size, or subject not only looks great but makes it much faster to find the one you need.
🧰 You can make a useful desk organizer from recycled jars, cereal boxes, or cardboard in about 10–20 minutes.
🏷️ Adding labels (with words or pictures) makes it super-easy to put things back in the right place, especially for younger kids.
🧠 Using the same study spot trains your brain to switch into 'work mode' when you sit down, improving focus over time.
How do I organize and decorate my child's study desk for #GroomYourRoom Day 4?
What materials do I need to organize and decorate a kid's study desk?
What ages are suitable for a study-desk organizing activity?
What are the benefits of organizing and decorating a child's study desk, and is it safe?
