Craft a Turkey Paper Roll
Make a turkey from a cardboard paper roll by painting, adding paper feathers, eyes, a beak, and glue; practice cutting, decorating, and assembly.
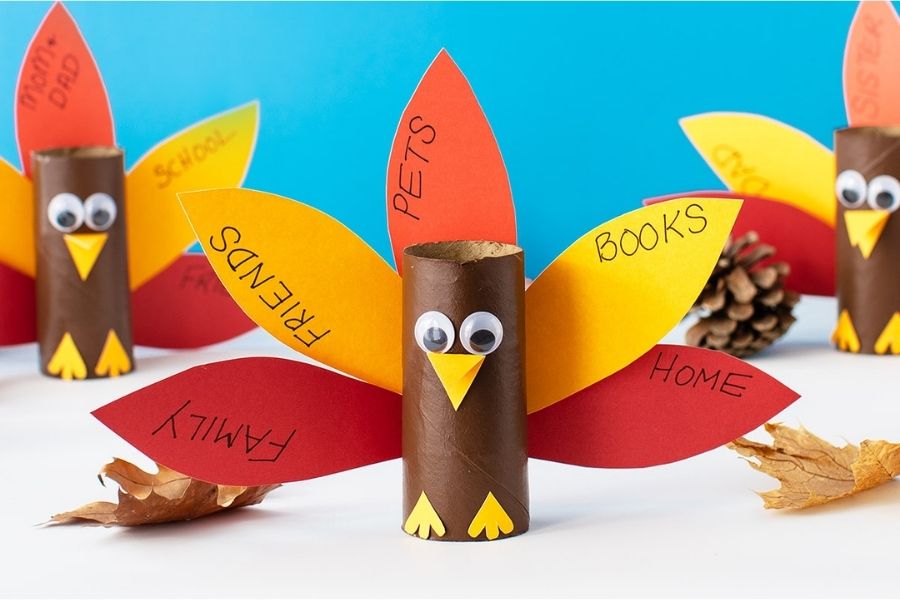
About this activity
Make a turkey from a cardboard paper roll by painting, adding paper feathers, eyes, a beak, and glue; practice cutting, decorating, and assembly.
What you need
Step by step
- 1
Step 1
Gather all your materials and set them on a clean table where you can work.
- 2
Step 2
Paint the outside of the cardboard paper roll brown using the paintbrush.
- 3
Step 3
Let the painted roll dry completely before touching it again.
- 4
Step 4
Draw several feather shapes on the colored construction paper using any bright colors you like.
- 5
Step 5
Cut out the feather shapes carefully with scissors.
- 6
Step 6
Prepare two eyes by taking two googly eyes or cutting two small white circles from paper.
- 7
Step 7
Cut a small triangle from orange paper for the beak and a small rounded wattle shape from red paper.
- 8
Step 8
Glue the paper feathers to the back of the roll in a fan shape so they look like a turkey tail.
- 9
Step 9
Glue the eyes onto the front of the roll where the face should be.
- 10
Step 10
Glue the beak and the red wattle below the eyes and use the black marker to add pupils and any extra decorations.
- 11
Step 11
Share your finished turkey on DIY.org.
Fun facts
How do you make a turkey paper roll craft?
To make a turkey paper roll, paint the cardboard roll brown and let it dry. Cut colorful paper into feather shapes and a small triangle for the beak. Glue feathers to the back of the roll so they fan out, then glue on googly eyes or draw eyes, and attach the beak. Add wattle (red paper) under the beak. Let glue dry completely. Optional: attach a paper base so the turkey stands.
What materials do I need for a turkey paper roll?
You'll need an empty cardboard paper roll, washable paints and brushes, colored paper for feathers, glue (white school glue or glue sticks), scissors, googly eyes or marker, and a pencil. Optional: red paper for the wattle, markers for details, stickers, glitter (supervise), and a small cardstock circle to use as a base. Use child-safe, non-toxic supplies and have a smock or newspaper to protect surfaces.
What ages is this turkey paper roll activity suitable for?
This craft suits preschoolers to elementary kids—roughly ages 3–10. Younger children (3–5) will enjoy painting and gluing with close adult help for cutting and handling small parts. Children 6–10 can do more cutting and assembly independently, practicing fine motor skills and following steps. Adjust complexity: simple glued feathers for toddlers, detailed layered feathers or painting patterns for older kids.
What safety tips should I follow for the turkey paper roll craft?
Use non-toxic, washable paints and child-safe glue; avoid small parts for children under three to prevent choking. Supervise scissor use and glitter; offer safety scissors for younger kids. Work on a covered surface and allow paints and glue to dry fully to avoid smudging. If using hot glue, an adult should handle it. This craft also supports fine motor skills and creativity, so praise effort rather than perfection.
Watch & Learn
Need help?
What can we use if we don't have a cardboard paper roll or brown paint?
If you don't have a cardboard paper roll or brown paint, roll and glue a strip of brown construction paper into a tube or color a plain roll with a brown marker or crayon before decorating.
My paint is smudging or the paper feathers keep falling off — how can I fix that?
Make sure to let the painted roll dry completely as the instructions say, speed drying with a hair dryer if needed, and use tacky craft glue, glue dots, or press and hold each feather firmly when gluing the tail fan.
How can I adapt this turkey paper roll craft for different age groups?
For toddlers, have an adult pre-paint the roll and pre-cut feathers and use stickers instead of glue, elementary kids can cut and glue the feather fan themselves with supervision, and older kids can paint detailed designs, add layered feather patterns, and draw extra decorations with the black marker.
How can we enhance or personalize the finished turkey?
Personalize the finished turkey by adding real feathers or glitter to the paper feathers, attaching pipe-cleaner legs inside the roll, making a movable wattle with a small brad under the beak, or writing the child's name on the back before sharing on DIY.org.