Build a screw press
Build a small hand-operated screw press from wood, a large bolt, washers, and a handle to press paper or fruit safely with adult supervision.
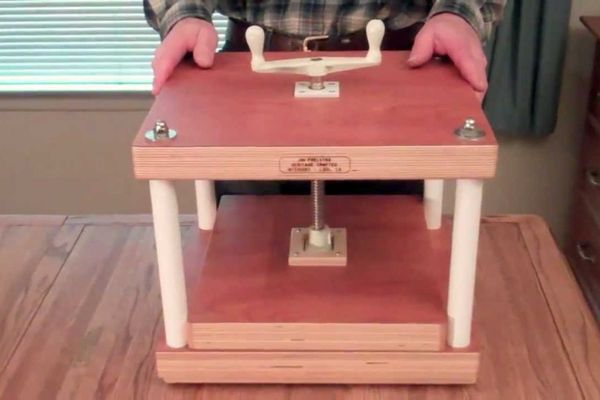
About this activity
Build a small hand-operated screw press from wood, a large bolt, washers, and a handle to press paper or fruit safely with adult supervision.
What you need
Step by step
- 1
Step 1
Sand all wooden pieces until smooth and splinter-free so they are safe to handle.
- 2
Step 2
Use a pencil to mark the center of the top beam where the bolt will go.
- 3
Step 3
Drill a hole through the top beam at your mark sized to the bolt so the bolt can slide through.
- 4
Step 4
Attach the two upright posts to the base board with screws to make two sturdy vertical supports.
- 5
Step 5
Screw the top beam to the tops of the uprights to form a C-shaped frame with the drilled hole centered.
- 6
Step 6
Drill a shallow pocket in the center of the small wooden pressing block sized to hold the wing nut so the nut sits flush.
- 7
Step 7
Glue the wing nut into the pocket in the pressing block so the nut is fixed to the block and the wings remain free to turn; let the glue set.
- 8
Step 8
Insert the bolt down through the hole in the top beam so the threaded end points toward the base.
- 9
Step 9
Place a washer and nut on top of the top beam and tighten to hold the bolt securely in place so the bolt cannot slide up or down.
- 10
Step 10
Slide a washer onto the threaded bolt under the top beam and then slide the glued pressing block with its wing nut onto the bolt so the nut engages the threads.
- 11
Step 11
Put the paper or fruit to be pressed on the base board centered under the pressing block.
- 12
Step 12
Turn the wing nut clockwise by hand slowly to lower the pressing block and press the paper or fruit; stop when the pressure is right and do not over-tighten.
- 13
Step 13
Share a photo and story of your finished screw press on DIY.org
Fun facts
How do you build a small hand-operated screw press for pressing paper or fruit?
Start by cutting two sturdy wood blocks: a base and a top crossbeam. Drill a centered hole through the top sized for the bolt. Insert the large bolt from above so its threaded end points down; add washers under the head and a nut below the pressing plate to guide movement. Attach a handle (a wooden dowel or metal rod) through or to the bolt head so it can be turned. Assemble a removable pressing plate and platform. Always have an adult handle sawing, drilling, and tightening, and test slowly wit
What materials do I need to build a child-friendly screw press?
You’ll need two thick wood pieces for base and crossbeam, a large fully threaded bolt (size depends on scale), matching nut, several flat washers, a pressing plate (metal or plywood), a base platform, a wooden dowel or metal rod for a handle, sandpaper, wood glue or screws, clamps, and drill and drill bits. Optional: rubber padding for the pressing plate and safety goggles for adults and kids.
What ages is making a wooden hand-operated screw press suitable for?
This project suits children in stages: ages 6–8 can join for planning, choosing fruit and arranging materials while adults do tool work. Ages 9–11 can help measure, sand, and assemble with close adult guidance. Ages 12+ may operate simple hand tools and turn the press with supervision and instruction. Always have an adult handle cutting, drilling, and tightening; keep younger children away from rotating parts and pinch points.
What safety precautions should we follow when using a homemade screw press?
Safety first: always supervise. Wear eye protection and keep fingers clear of the pressing area; never let children place hands under the plate while turning. Adults should do all cutting, drilling, and installing the bolt. Use washers and a nut to keep the bolt aligned, and pad pressing surfaces to avoid splinters. Turn the handle slowly and test with soft materials before actual use. Clean fruit thoroughly and store the press out of reach when not in use.
Watch & Learn
Need help?
What can we use instead of a wing nut or specific bolts if they are hard to find?
If you can't find a wing nut, glue a standard hex nut into the pressing block's drilled pocket and glue or screw a short wooden dowel or large washer to that nut to act as a hand-turning handle for the 'Glue the wing nut' and 'Turn the wing nut clockwise' steps.
Why won't the pressing block move when I turn the wing nut, and how can I fix it?
If the pressing block doesn't lower when you turn the wing nut, verify the glued nut's threads match the bolt, ensure the washer and top nut on the top beam are tightened so the bolt cannot slide, and if it still binds remove the pressing block, sand or re-drill the pocket, and re-glue the nut in the correct orientation.
How can this activity be adapted for different age groups?
For toddlers and preschoolers have an adult pre-drill holes and attach the uprights while the child sands pieces and turns the wing nut during 'Turn the wing nut clockwise', for elementary-age kids let them mark, drill with supervision, and screw the frame, and for teens challenge them to design a stronger pressing block or experiment with different bolt sizes.
How can we extend or personalize the screw press after it's built?
Personalize and improve your press by painting or carving the base and top beam, adding rubber pads to the pressing block and base to protect paper or fruit, mounting a removable juice tray on the base, or attaching a small spring scale to measure pressure while you 'Put the paper or fruit to be pressed' and 'Turn the wing nut clockwise'.