Build a plastic cap robot
Make a small robot using plastic bottle caps, cardboard, glue, and pipe cleaners; design movable arms and decorate while learning about balance and creativity.
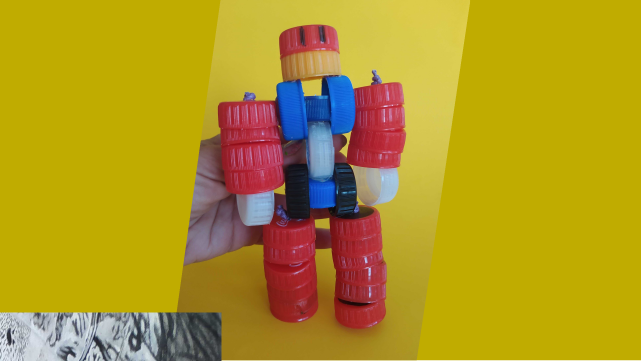
About this activity
Make a small robot using plastic bottle caps, cardboard, glue, and pipe cleaners; design movable arms and decorate while learning about balance and creativity.
What you need
Step by step
- 1
Step 1
Gather all your materials and put them on a clear workspace.
- 2
Step 2
Pick two bottle caps one for the body and one for the head.
- 3
Step 3
Cut a small rectangle of cardboard about the same width as the body cap to make a base.
- 4
Step 4
Glue the body cap to the center of the cardboard base.
- 5
Step 5
Glue the head cap on top of the body cap.
- 6
Step 6
Carefully make two small holes opposite each other near the rim of the body cap for the arms.
- 7
Step 7
Thread two pipe cleaners through the holes so equal lengths stick out on both sides.
- 8
Step 8
Twist the pipe cleaner ends inside the cap to anchor each arm.
- 9
Step 9
Bend the outer parts of the pipe cleaners to shape arms and make hands.
- 10
Step 10
Glue two small cardboard feet under the base to help the robot stand.
- 11
Step 11
Draw a face buttons and other details on the caps with your colouring materials.
- 12
Step 12
Stand the robot on a flat surface to check its balance.
- 13
Step 13
Adjust the feet or bend an arm slightly until the robot stands steady.
- 14
Step 14
Share your finished plastic cap robot on DIY.org
Fun facts
How do I build a plastic cap robot with my child?
Start by collecting assorted plastic bottle caps and a sturdy cardboard piece for the robot’s body. Cut cardboard into a base shape, then arrange caps for the head, torso, and legs. Attach caps with glue (hot glue for adults, craft glue for kids) and press firmly. Make movable arms by threading pipe cleaners through small holes or attaching with brad fasteners so they rotate. Decorate with markers, stickers, or googly eyes, let dry, then test balance and adjust weight as needed.
What materials do I need to make a plastic cap robot?
You’ll need assorted plastic bottle caps, a piece of cardboard for the body, pipe cleaners for arms, craft glue (or a hot glue gun for adult use), scissors or a craft knife (adult use), markers or paint for decorating, and optional googly eyes, brad fasteners, washers for weight, tape, and stickers. A hole punch can help make arm holes. Always supervise use of hot glue, knives, or small parts to keep children safe.
What ages is this activity suitable for?
This activity suits toddlers to tweens with supervision levels tailored to age: ages 3–5 can help sort caps, stick pieces, and decorate with close adult help; ages 6–9 can cut cardboard, shape pipe-cleaner arms, and glue with assistance; ages 10+ can design movable joints, balance weight, and use small tools more independently. Always supervise small parts and hot glue; adapt complexity to a child’s fine motor skills and attention span.
What are the benefits of building a plastic cap robot?
Making a plastic cap robot supports creativity, fine motor development, and basic engineering thinking—kids learn about balance, weight distribution, and simple joints. It encourages recycling by reusing caps and cardboard, boosts problem-solving and patience during design and assembly, and promotes language and social skills when done together. The hands-on project also fosters pride in making something functional and decorative from everyday materials.
Watch & Learn
Need help?
What can we use instead of pipe cleaners or cardboard if we don't have them?
If you don't have pipe cleaners, use thin craft wire or twist ties threaded through the holes for arms, and if you lack cardboard for the base, cut a piece from a cereal box or use a sturdy plastic lid to glue the body cap onto.
My pipe cleaner arms keep slipping out or the head cap falls off—how do I fix that?
If arms slip, make the two small holes with a hole punch or heated needle and twist the pipe cleaner ends tightly inside the cap as instructed, and if the head cap comes loose, add a dab of stronger glue or a bit of hot glue between the body and head caps to secure them.
How can I adapt this activity for younger toddlers or older kids?
For toddlers, have an adult glue the body cap to the cardboard base and pre-punch holes so they can simply thread pipe cleaners and color the face, while older kids can cut their own base, use hot glue for stronger bonds, add small screws or LEDs, or build multi-cap robots.
What are creative ways to enhance or personalize the plastic cap robot after finishing it?
Personalize your robot by gluing on buttons or googly eyes, drawing button-controls as the instructions suggest, bending extra pipe cleaners to make antennae, adding cardboard arms or cap-wheel attachments under the feet so it can roll, and then share photos on DIY.org.