Beautify Bottles!
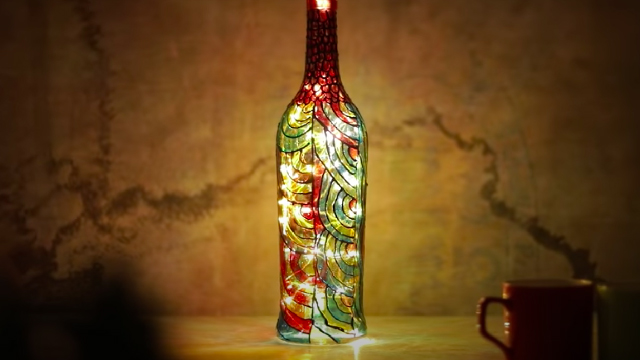
Decorate and repurpose empty plastic or glass bottles into colorful vases, planters, or lanterns using paint, stickers, yarn, and safe tools.
About this activity
Decorate and repurpose empty plastic or glass bottles into colorful vases, planters, or lanterns using paint, stickers, yarn, and safe tools.
What you need
Step by step
- 1
Step 1
Spread the newspaper or table cover on your workspace so paint and glue stay clean.
- 2
Step 2
Peel off any labels and sticky residue from the bottle using your fingers or scissors.
- 3
Step 3
Wash the bottle inside and out with warm soapy water to remove dust and glue bits.
- 4
Step 4
Dry the bottle completely with a towel so paint will stick well.
- 5
Step 5
Choose whether you want a vase planter or lantern and pick your paint colors and decorations.
- 6
Step 6
Paint a smooth base coat over the bottle using a brush or foam brush.
- 7
Step 7
Let the base coat dry completely before touching it.
- 8
Step 8
Add a second coat or paint small designs and let those dry too.
- 9
Step 9
Wrap yarn or twine around the bottle neck or body and secure the ends with a dab of glue.
- 10
Step 10
Press stickers or adhesive gems onto the bottle to make it sparkly and fun.
- 11
Step 11
Ask an adult to cut the bottle if you want an open-top planter or a lantern opening.
- 12
Step 12
If you made a planter add potting soil and plant your small plant gently into the bottle.
- 13
Step 13
If you made a vase fill it with water and add fresh flowers or if you made a lantern place a battery-operated tea light inside.
- 14
Step 14
Let everything dry and set for a few hours so glue and paint are fully secure.
- 15
Step 15
Take a photo and share your finished beautified bottle on DIY.org so everyone can see your creation!
Fun facts
How do you decorate and repurpose empty bottles into vases, planters, or lanterns?
Start by cleaning bottles and removing labels. Plan the design, then paint a base coat or wrap with yarn. Add stickers, glued-on decorations, or decoupage. For planters, add drainage pebbles and potting soil; for lanterns, insert battery tea lights or fairy lights (not open flames). Seal painted areas with a clear coat. Allow full drying between steps and supervise children during cutting, gluing, or drilling to finish a colorful vase, planter, or lantern.
What materials and tools do I need to beautify bottles?
You’ll need empty, washed plastic or glass bottles, non-toxic acrylic paint or spray paint, paintbrushes, painter’s tape, stickers, yarn, ribbon, and glue (craft glue or hot glue with adult use). Also gather scissors, child-safe cutting tools, sandpaper, clear sealant, battery tea lights or fairy lights, potting soil and small pebbles for planters, and protective newspaper or drop cloth. Keep glass-cutting or hot-glue tasks for adults and choose child-safe versions of tools when possible.
What ages is bottle decorating suitable for?
This activity suits many ages: toddlers (2–4) can stick stickers and wrap yarn with close supervision; preschoolers (4–6) handle simple painting and gluing; elementary kids (7–11) can cut, design, and assemble with guidance on sharp tools; older kids and teens can use drills, hot glue, or more intricate techniques under adult supervision. Choose plastic bottles and safer tools for younger children, and reserve glass cutting or power tools for adults.
What safety tips should I follow when decorating bottles?
Always supervise children, especially around glass, sharp tools, hot glue, or spray paint. Use non-toxic paints, work in a well-ventilated area, and protect surfaces. Prefer battery-operated lights, not candles. If cutting bottles, have an adult do the cutting or use pre-cut containers. Keep small decorative pieces away from very young children. Wear gloves and eye protection for glass work, and ensure items are fully dry before use to avoid smudging or burns from hot glue.
Watch & Learn
Need help?
What can I use if I can't find a foam brush, adhesive gems, or a battery-operated tea light?
Use a clean kitchen sponge or regular acrylic/house paint in place of a foam brush and craft paint, swap adhesive gems for sequins or magazine cutouts glued on with craft glue, and use a small LED string light or votive instead of a battery-operated tea light.
My paint is peeling or not sticking—what step did I miss and how can I fix it?
If paint peels, re-do the label-removal and wash steps to remove sticky residue, dry completely, lightly sand the bottle, then apply a second base coat or a primer and let each coat dry fully before touching.
How can I adapt this project for different ages—what should younger kids do versus older kids?
For preschoolers use washable paint, stickers, pre-cut bottles and have an adult handle any cutting or hot-glue work, while older kids can paint detailed designs, wrap twine themselves, cut the bottle with supervision, add potting soil and a plant, or make a lantern with a battery-operated tea light.
How can I make my beautified bottle last longer or look fancier?
After the second coat dries, add a clear sealant to protect the paint, decoupage tissue-paper designs before applying adhesive gems or yarn, or glue on a loop of wire to hang the lantern and then take a photo to share on DIY.org.