Add Emotions to Your One Line Portraits!
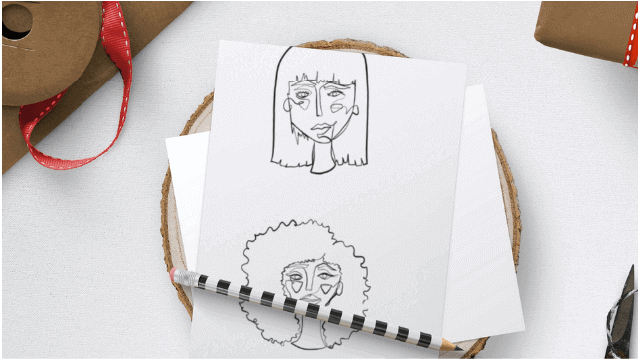
Draw one-line portraits using a single continuous pen stroke, then add expressive eyes, mouths, and color to show different emotions and storytelling.

Drawing Apps
Step-by-step guide to add emotions to your one-line portraits
Step 1
Gather your materials and lay them out on a flat workspace.
Step 2
Warm up by drawing quick one-line doodles on scrap paper without lifting your pencil.
Step 3
Lightly draw a small guideline on your final paper to mark where the face will go.
Step 4
Draw your one-line portrait on the final paper using a single continuous pen stroke without lifting the pen.
Step 5
Wait a minute for the ink to dry completely.
Step 6
Erase any pencil guidelines carefully so only your inked line remains.
Step 7
Add expressive eyes to the face using simple shapes like circles lines or dots.
Step 8
Draw an expressive mouth and eyebrows to show the emotion clearly.
Step 9
Add one storytelling detail such as a hat a teardrop a speech bubble or a tiny background object.
Step 10
Color your portrait to match the emotion using your coloring materials.
Step 11
Make at least two more one-line portraits showing different emotions by repeating the same steps.
Step 12
Share your finished one-line portraits on DIY.org.
Help!?
What can I use if I don't have the recommended pen or final paper for the one-line portrait?
If you don't have a fine-tip pen or the final paper, use a felt-tip marker, gel pen, or sharpened colored pencil on any smooth paper and allow marker ink to dry or set the pencil gently before erasing the pencil guideline.
My pen keeps lifting or the ink smudges when I try the continuous line—what should I do?
Practice the single continuous pen stroke on scrap paper, draw your guideline lightly on the final paper, work slowly to avoid lifting, and wait a full minute for the ink to dry completely before erasing to prevent smudges.
How can I adapt this activity for different age groups?
For younger children simplify by using sticker eyes and washable markers for the expressive features, provide thicker paper and pre-drawn guidelines, while older kids can use thin pens, experiment with more detailed eyebrows and mouths, and add complex storytelling details.
What are some ways to extend or personalize the finished one-line portraits?
Extend the project by making at least one portrait series showing emotion changes, adding mixed-media storytelling details like a tiny hat or watercolor background, or compiling and sharing your set on DIY.org.
Watch videos on how to add emotions to your one-line portraits
Showing Emotions | Acting Lessons for KIDS!
4 Videos
Showing Emotions | Acting Lessons for KIDS!
Explore Your Feelings with Art | Tate Kids
Let's Learn About Emotions | EYFS | Kindergarten Lessons
Kids Describe Emotions | HiHo Kids
Facts about expressive drawing and visual storytelling
🖊️ Pablo Picasso and other artists often made portraits using a single continuous line—some of his one-line sketches are famous around the world.
👁️ Blind contour drawing (where you keep your eyes on the subject, not the paper) is a classic exercise that builds observation and hand–eye coordination.
🎭 Cartoonists and animators can show dozens of emotions by changing only the eyes and mouth—small tweaks create big feelings.
🌈 Color changes how we read emotion: blues often feel calm or sad, while reds and oranges read as energetic, excited, or angry.
⏱️ People can recognize facial expressions in under a tenth of a second—faces tell tiny stories super fast!
How do you draw one-line portraits and add emotions and storytelling?
What materials do I need to make one-line portraits with expressive eyes and color?
What ages is the one-line portrait emotion activity suitable for?
What are the benefits of drawing one-line portraits with expressive features?
